Thursday, February 13, 2014

Kindergarten Bluebonnets

For rodeo this year, kindergarten made bluebonnets. We started by reading the Tomie de Paola book, The Legend of the Bluebonnet. I actually found a board book that is a simpler version of the story and easier for the kindergartners to understand.

In keeping with giving the students choices, I had 3 choices available for them.

The first choice started out by covering a piece of white watercolor paper with tissue paper. They used a paintbrush and water to adhere the tissue paper to the paper. Once the paper had dried, they took all of the tissue paper off and threw it away. The paper had bled onto the white paper, leaving a really unique effect for each paper. They used scrap wallpaper samples to cut out a vase (I gave them a template to trace) and glued this onto the now colored background. Each student glued 4 strips of green paper onto the vase, creating stems. Then I gave them a plate with a little bit of blue tempera and a little bit of white. I showed them how to use only their thumb to dip into the paint and stamp on their paper. They started by using the blue paint and then stamped the white paint on top.

The second choice also began by adding colored tissue paper to their white paper for the background. Once they had taken all of the dried paper off, they added their vase and stems. For this project, instead of painting their flowers on, they used white and blue bottle caps and buttons to create the bluebonnets. I gave each student some craft glue to dip their caps into and they placed them on the stems. I did not give them directions on the way that they should place their caps and buttons, but many of them naturally began making patterns, a good continuation from their math class.

The last project was done on burlap. While the other groups were working on tissue paper, this group was working on sewing. They used a marker and a ruler to draw a line from the top of their burlap to the bottom. This was their guide for sewing. They used a basic running stitch to create the stem of the bluebonnet. I spent the majority of the time with this group, while my student teacher worked with the 2 tissue paper groups. 
When the stem was finished, they glued strips of green construction paper on to and then used blue and white paint to make their thumbprint bluebonnets.



Wednesday, February 12, 2014

PreKinder Valentine Hearts

Here is a fun project that I did with my 2 PreK classes for Valentine's Day.

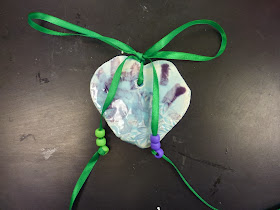
I gave each child a slab of clay. I had bought 6 heart cookie cutters and they used these to cut a heart shape out of the clay. We used a straw to poke a hole in the top of the heart, so that we would be able to add a ribbon once they were finished.

I put a texture plate at each child's place and they used this to create a unique texture on their heart.

For the next class, the hearts had been fired in the kiln and were ready to glaze.  I had cups of glaze ready in the 6 basic colors (red, yellow, orange, blue, green and purple). They came to the counter and chose one cup and glaze their entire heart with this color. When they were finshed, they returned the cup and sat on the carpet.

I showed them how to use a small brush to paint a simple pattern on their heart, using a second color. They went back to the counter and chose a different color to add their patterns (using the cups that we had used from before, so that I only had to prep the cups 1 time).

After I fired the hearts 1 more time, we were ready to add a ribbon. I prepared the ribbons by adding a piece of tape to each end so that they would be able to push the ribbon through the hole. Then they were allowed to get 3 beads for each end of the ribbon (6 total). They brought their heart to one of the adults in the room and we tied the ribbon into a bow.

Happy Valentine's Day!


Second Grade Aztec Suns

Continuing with our Latin American projects, second grade did suns inspired by the artwork of the Aztecs.

Everyone began the project by drawing their idea for a sun in their sketchbook. They had to make sure that their drawing was large (one of my focuses for my 2nd graders this year- they love drawing everything tiny!), that it had a variety of patterns and that it used 1 color scheme (they chose from warm, cool or complementary colors.

Once they had finished their preliminary sketch, they chose which project they wanted to work on.

Their first choice was an aluminum bas relief. They drew their sun on a piece of manila that was cut to the size of the aluminum (5 x 5). Then they taped the manila onto the foil and traced the design. They were told to do the tracing while the aluminum was sitting on top of their sketchbook, so that it would leave a nice impression. After tracing, they removed the manila and used their pencil to color in certain sections of their design, creating the bas relief. Color was added with Sharpie markers and then the aluminum was stapled to a piece of black construction paper to create a matt.

The second choice was a printing project. The students drew their design on a piece of 5 x 5 manila paper. They taped this onto a piece of styrofoam that had been cut to the same size. Once the design had been traced, they removed the manila and used their pencil to color in certain sections. They chose pieces of construction paper that fit their color scheme and printed their design onto the paper. The prints were glued onto black construction paper to create a matt.


The third choice was a sculpture project. The students used recycled materials to create a sculpture of the sun that they had drawn in their sketchbooks. I have a variety of boxes outside of the artroom where the faculty can drop off their recycling. I have egg cartons, boxes, newspaper, bottle caps, lids, containers, cardboard rolls, magazines, etc. The students have gotten used to going to these bins anytime they are in need of materials. 

The students collected the materials that they wanted for their sun and stored them in a zip-lock bag. They were glued onto a piece of cardboard (saved from packs of construction paper that the teachers get with the students school supplies at the beginning of the school year) with craft glue (Elmer's is not strong enough for this project). When everything had been glued in place and was dry, they used markers and tempera to color it in their color scheme. The last step was to add details by gluing sequins onto the sculpture.