Sunday, November 14, 2010

TAEA Conference, Austin, TX

I just got back from our annual TAEA conference in Austin, TX. Great weekend, lots of ideas and lots of fun!


Took a light painting class- WOW! Very cool! Check out the first results.

Pin It

Thursday, November 4, 2010

Kindergarten Art Eyes

Materials

· watercolor paper
· tempera cakes
· paintbrushes
· water cups
mirrors

The main purpose of doing this activity was to get the students adjusted to using their entire paper and teaching them the proper painting procedures. The end product turned out so much better than I could have anticipated!!!!

I tried to give the students colors that did not correlate with their true eye colors, leading them to be creative in their paintings.

I had them look in a mirror and find the shapes- ovals, circles, etc.
We talked about how their brush needed to take a bath after each color so that the other colors would not get dirty and then I let them go for it!

Gorgeous!! Pin It

Fifth Grade Reptiles

Materials Needed

· 9 x 24 black paper
· pencils
· erasers
metallic markers


Resources:
Chameleon's Colors Chisato Tashiro
Visuals of chameleons, iguanas and other reptiles

I started this project by reading Chameleon's Colors by Chisato Tashiro to my fifth grade students. Then the students had to draw a reptile that incorporated at least 3 pattterns, 2 visual textures.

In their sketchbook, they practiced drawing a reptile, including a branch for it to sit on. Then we talked about the different patterns that we could use for different sections of the reptile.

When they were ready, they drew their reptile on a piece of black paper and sketched in the different sections.

They added color by using metallic markers. Pin It

New 2010 Projects!!!

I am ready to start posting the projects that my students have been working on this year! Yea! It's been a very busy beginning of the year.

We were fortunate enough to get a new building this year- WOW! New building, new furniture, new everything! That does not happen often!

It's been fun reorganizing, cleaning out and starting fresh! Pin It

Saturday, September 11, 2010

Looking for Ideas

I am in need of lesson ideas for a student who is visually impaired. This student has physical limitations as well. An aide comes with this student to my art room, so there will be someone to help in whatever activity I plan, however, I have no experience with this in an artroom setting.

Anyone who has suggestions for projects, lessons, activities, please comment here. I would really appreciate your feedback!

Thanks! Pin It

Wednesday, August 11, 2010

Fifth Grade Texture Canvases

Materials Needed

• canvas panels (Sax #412499)
• Liquitex Gloss Gel Medium (Sax #437486)

• gouache set of 24


• brushes

We started this project by covering a canvas with gel medium. As the students were doing this, I passed out baskets to each table. In the baskets, I had put a variety of texture tools. Each student was to create 6 different sections of texture on their canvas, using the tools that were in their basket. 


We reviewed all of the color schemes that we had learned in previous years and this year (warm/cool, primary/secondary, complementary, analogous, monochromatic). Each student had to choose 1 color scheme for their canvas.
 
When everything was dry, the students used gouache paints to paint their canvas. I gave each table a palette with paint and they were allowed to mix the paints as they needed them to fit their color scheme.
 
This was a fun project for my 5th graders. They had never touched a canvas before, let alone been able to create their own artwork on one. It was fun to see them taking so much pride in their artwork when they were given their artistic tools. Pin It

Fifth Grade Mandalas

Materials Needed

• sketchbook
• ruler
• compass- 1/table
• 12 x 12 paper
• fine-tipped black markers
• Crayola color sticks

• black poster board

Fifth grade learned about various cultures that make mandalas. They focused on how radial symmetry is created in the mandalas. They also learned how to use a compass and a ruler to create different lines and then practiced making lines in their sketchbooks.

They were given a 12” x 12” piece of paper. We started by folding the paper corner to corner, so that we had a large triangle. We folded again, corner to corner to create a smaller triangle and then 1 more time to form an even smaller triangle. In total, we folded 3 times. When we opened our paper, we had 8 triangular sections radiating around the center of our paper.

We used the compass to draw at least 4 circles radiating from the middle of our paper. If the student chose to draw more they could, but I showed them what would happen to their designs if they drew too many (the designs would have to be very small).

I then did a lesson on organic and geometric designs. We looked at shapes around us and classified them. We brainstormed a list of geometric shapes and a list of organic shapes. The students had to choose whether they wanted their mandala to have organic or geometric.

They began by drawing a design in 1 section of the outer ring. They then had to repeat that exact design 7 more times around the outside ring. I had them move to the next ring and create another design and repeat the process. They continued until all rings were finished.

I had them trace the entire design with a black marker and then we talked about color schemes. We reviewed warm and cool colors, and complementary colors. There were 2 new ones that I added on to their list of color schemes. We learned about analogous colors (neighbors) and monochromatic colors (for this, we looked at Picasso's Blue Period paintings).


Once we had all of the color schemes, I had them choose 1 color scheme and they wrote it on the back of their paper (as a reminder) along with the colors that went into this scheme. They used Crayola Color Stix and Sharpie markers to color their radial designs.

I walked around and reminded them that they had to repeat the color in each section, just as they had done when they were drawing. Pin It

Fourth Grade Texas Wildflowers

Materials Needed

• 9 x 12 poster board
• pencils
• black glue
• watercolors/brushes
• newspaper
Other resources
The Legend of the Bluebonnet- Tomie de Paola
The Legend of the Indian Paintbrush- Tomie de Paola

Getting to Know series- Cezanne
Cezanne prints
Texas wildflower prints

My fourth graders read the books The Legend of the Bluebonnet and The Legend of the Indian Paintbrush, both by Tomie dePaola. When we finished, we looked at pictures of different Texas wildflowers. Using these pictures, they created their own still-life of Texas wildflowers. They started their still-life with a pencil drawing on a piece of white paper.

When they finished, they turned the paper over to the back and they colored on the back of the drawing with their pencil. It was really important to make sure the entire paper was covered in graphite.


They placed this on top of a piece of poster board, with the graphite touching the poster board. They used their pencil to trace over their original drawing, creating a graphite transfer onto the poster board.

Using black glue (I make this with school glue and black acrylic), they traced their lines. When the glue was dry, they used watercolors to paint their flowers. They used many different techniques to paint. They used wet-on-wet and dry brush. They used different values of the same color and made some of their own colors.

These turned out so stunning, that I used many of them for various shows throughout the year. Pin It

Friday, August 6, 2010

My Personal Artwork

I love summer! I have a chance to work on my own artwork, which I don't really have an opportunity to do during the school year. This summer, I have been experimenting with metal embossing. I have been making a lot of jewelry (pendants, rings, bracelets, earrings) and also wall hangings.

Here are a few things that I have done.


I started by making just pendants and rings. This is a periwinkle blue pendant/ring combo.


I experimented with mixing 2 colors in 1 piece. Here is a blue/violet pendant.


Then I started making entire sets- pendant, ring, earrings, bracelets.


This is a piece that I just finished for my bathroom. 8 squares with the same pattern, alternating purple and green with a $2 frame that I refinished. Pin It

Wednesday, August 4, 2010

Fourth Grade Spirit Rattles

Materials Needed

• Clay- preferably red
• tools
• glaze
• small pieces of fired clay- to place inside rattle
Arrow to the Sun: A Pueblo Indian Tale

Fourth grade read the book Arrow to the Sun: A Pueblo Indian Tale. They discussed different types of rattles- baby rattles, maracas, native American rattles, etc.

They planned their rattle by drawing a sketch of what they wanted it to look like in their sketchbook. I had a variety of Native American resources on hand for them to look at, including resources that explained the symbology that is used.


When they were ready, they were given a ball of clay. They formed this clay into a pinch pot. They put pieces of already fired clay into the pot and then made another pinch pot. The pots were attached to create a sphere. Some students stepped outside of the box and made different shapes than spheres. I had hearts, stars, cubes, but the majority ended up being spheres.

A handle was formed out of more clay.

The students added textures to their rattles with different tools and texture plates.

After the rattles were fired, they were glazed. When we were glazing, we talked about how they didn't have to cover the entire rattle with glaze. The beautiful red clay could show through. They could use the glaze to highlight the designs and textures that they had created in their rattle.

We then covered the entire rattle with clear glaze and I fired them one last time. Pin It

Fourth Grade Imaginative Instruments

Materials Needed

• Oil pastels
• Fine line black markers- permanent
• Colored pencils
• Sheet music
• Colored construction paper
• Construction paper crayons
• Colored markers
• Mod podge
• Sketchbooks
 
Other Resources

The Remarkable Farkle McBride- John Lithgow
“Brass Section”- Romare Bearden
“Musical Forms”- Georges Braque


Fourth grade read the book The Remarkable Farkle McBride by John Lithgow and then made a list of all of the instruments that were presented in the book. Each student chose 2 instruments that interested them (from different families- strings, woodwinds, brass, etc) and practiced drawing them in their sketchbooks using either photos or instruments that I had handy in my room.
 
I showed them how they could create shadows and highlights in a drawing by using color value. Darker values creating the shadows and lighter values creating the highlights. They chose 1 of thier instruments for their project and drew it on a piece of construction paper. They had to draw the same instrument at least 3 more times, but they had to draw it different sizes. When they were finished, they had at least 3 of the same instrument in varying sizes.

 
Each instrument was then colored using a different medium. I had oil pastels, color stix, markers, construction paper crayons, etc for them and demonstrated how each could be used to create the effect that we were looking for.
 
When they colored their instruments, they added shadows and highlights by using tints and shades of color.
 
After each instrument was colored, we used pieces of old music scores and glued these onto our artwork and then covered the composition with a layer of Mod Podge.
Pin It

Fourth Grade Egyptian Masks

Materials Needed

• plastic masks-  purchased from Sax (Make-A-Mask Plastic Face Form http://store.schoolspecialtyonline.net/OA_HTML/ibeCCtpItmDspRte.jsp?item=516866&minisite=10206
• cardboard (Egyptian headdress/"beard")
• masking tape
• plastercraft

• tissue paper- variety of colors
• acrylic paint
• jewels
• white paper (eyes)
black marker to outline eyes

Fourth grade looked at "Egyptian Mummy Case" and "Limestone Bust of Queen Nefertiti", both by unknown artists. They looked for the symmetry in the masks and the patterns that were used to decorate them. Then the students began making their own Egyptian Pharaoh’s mask. I had a variety of Egyptian resources on hand for them so that they could look for hieroglyphics, patterns, colors, etc.
 
I had a parent volunteer help me cut poster board headdresses that the students taped onto the masks. They had a hole in the middle that fit over the top of the facial form.
 
This was then covered with strips of plastercraft. 2 layers is plenty. When the plaster was dry, they removed the plastic mask and covered their work with colored tissue paper. They used paint and other accessories to decorate the mask and make it look like a pharaoh’s burial mask.
Pin It

Fourth Grade Color "Wheels"

Materials Needed
• pencils/erasers
• masking tape
• watercolors/brushes
• water containers
individual color wheels

Fourth grade went more in depth into the color wheel than they have in previous years. They learned a mnemonic device (memory) for remembering the order of the colors in the color spectrum and rainbows- ROY G. BIV (red, orange, yellow, green, blue, indigo, violet). They used this to paint a new version of a color wheel. They taped two pencils together with an eraser between them. With this device, they drew ribbons on their paper. Then they used watercolors to paint the ribbons. They began with red (the first color in the rainbow- R) and continued through the spectrum.
Pin It

Thursday, July 29, 2010

Fourth Grade Day of the Dead Calaveras

Materials Needed

• paper patterns for skulls
• paper patterns for craft stick skeletons
• Claycrete (p. 386 Sax catalog)

• white glue
• craft sticks
• wax paper
• acrylic paint
• markers
• scrap materials to decorate
• scissors
Other Resources
Calavera Abecedario

Day of the Dead resources
skeleton patterns


The population of my school is almost 100% Hispanic. So this year, I decided to do a Day of the Dead project with my fourth graders. They already had a lot of information about the holiday and I actually learned a lot from them!

I started the project by reading the book Calavera Abecedario to my fourth graders. They made a list of the different Calaveras that the author used in the book. Then they discussed the similarities and differences between the Day of the Dead holiday and our Halloween.

They began creating their own Calavera by making an armature for their sculpture out of craft sticks. I had a skeleton pattern xeroxed for them to follow and they glued the sticks together in the shape of a skeleton. Then they mixed Claycrete (I ordered this from Sax Arts. I ordered 2 20 lb boxes and it was MORE than enough for my 100-120 students to create their entire calavara), water and glue together until it had a nice sticky texture (you don't want it to be dripping wet- it won't dry) and began placing it on top of their armature. When we did this part, it was important to wrap the Claycrete around the popsicle sticks so that it would not fall off when it dried.

During the next class, I had skull patterns ready for them. They also used the Claycrete mixture to make the skull of the calavera. 

Once both pieces were dry, we were able to attach the two pieces together, using a needle and thread so that they hung loosely together.

The students began decorating them using a variety of materials that I had pulled out for them- felt, tissue paper, beads, sequins, fabric, paper, colored glue, etc. This was pretty open. I put together a basket for each table and added whatever scrap/excess materials I could find. 
Pin It

Third Grade Illuminated Letters

Materials Needed

• copper foil
• graph paper
• pencils
• craft sticks
• permanent markers
• magazine/newspapers
Books
Magic in the Margins: A Medieval Tale of Bookmaking-W. Nikola-Lisa
Marguerite Makes a Book -Bruce Robertson
Bestiary: An Illuminated Alphabet of Medieval Beasts -Jonathan Hunt


Third grade read Marguerite Makes a Book by Bruce Robertson. We discussed the process of book-making in medieval times and compared it to how books are made today. We focused on the illuminated letters that were created and what characteristics they had.

We then looked at a variety of relief sculptures and noted how parts of the sculptures stood out and parts of them receded. They then started their own relief sculptures, using their initials and embossing a piece of copper foil.

First, they drew their initials on a piece of graph paper. I had them use graph paper to help them with measurement. It made it much easier for them to make their letters thick, using the grid. I have used a variety of different sizes, but have found that the smaller grids are more difficult for the students to use.

After they had their design ready on graph paper, they transferred it to a piece of copper foil by placing the paper over the foil and carefully tracing the initials with a pencil. I had to remind them to place a magazine or stack of newspapers under their copper so that the pencil would leave an impression.

They used popsicle sticks and their pencils to press their designs into the copper.

When their entire design was complete, we used permanent markers to add color. Pin It

Tuesday, July 20, 2010

Second Grade Barn Dance

Materials Needed

• watercolor paper
• 1/2 sheet watercolor paper- scarecrow
• oil pastels
• watercolors
• brushes
• black permanent markers
• kosher salt
• self-adhesive foam buttons
• pencils/erasers
• straw/raffia- 1" pieces
Barn Dance- Bill Martin, Jr

Getting to Know series- Moses, Rockwell Norman Rockwell prints
Grandma Moses prints


I began the project by reading the book Barn Dance by Bill Martin, Jr to my second graders. As I was reading, I asked the students to focus on the following things: the scarecrow, the objects they saw on the farm. When I finished reading, we brainstormed a list of things that could be found on a farm. We also talked about what the scarecrow looked like- what was he wearing, what is his job, etc.

I gave the students a 1/2 piece of watercolor paper and asked them to draw a scarecrow. I demonstrated how they could use basic shapes (squares, rectangles, circles, triangles, etc) to draw the body, clothes, patches of their scarecrow. They traced their scarecrow with black marker and then painted him/her using watercolor markers.


When it was time to work on the background paper, we had a discussion about foreground and background. We looked at different landscape prints and pointed out the size of objects that were in the foreground and in the background. We also took note of how the horizon line is rarely is straight line.

I had them draw their background in pencil, adding any details that they wanted to have on their farm- reminding them to keep in mind size. They traced everything with a black marker.

They used oil pastels to color their barn, animals, trees, and at the end added white stars in the sky. They did not color their ground or sky with pastels.

Once the oil pastels were finished, we got out the watercolors again. They used the watercolors to paint their ground (most used green, however, a few used brown) and the sky. We were looking for a night sky, so most used black (we rarely get to use black watercolor, so this was pretty exciting!). I showed them how to dilute the color so that it was not pitch black.

When the background is dry, the students cut out their scarecrows and stuck them on using self-adhesive foam "O" to give it a 3-dimensional feel. I had pieces of raffia ready and they added these onto their scarecrow for a little more detail. Pin It

First Grade Warhol Hands

Materials Needed
• black construction paper- 24x10
• colored construction paper- 6x9
• tempera paint
• colored glue
Hands Can- Cheryl Hudson

Andy Warhol prints
Getting to Know series- Andy Warhol
 
We started this project by reading the book Hands Can and discussing all the things that our hands can do. Then I gave each student a piece of white drawing paper and had them trace their hand 3 times. I showed them how to trace without touching their fingers (we didn't want super skinny fingers) and how to close the hand at the bottom.
 
Then they cut out their hands. I demonstrated how to cut the paper by turning the paper, not the scissors. This really helped when it came to not cutting off fingers. When they had finished cutting all 3 of their hands, they were ready to start putting it all together.
 
Each student got a piece of black paper (24x9). We did a quick review of primary and secondary colors (you can read Mouse Paint at this point, if you want). We had just finished another project using primary and secondary colors, so we were able to review pretty quickly. The students get 3 pieces of colored paper in the colors that they chose.
 
They glued these onto their black paper:
1) using glue dots (just a dot, not a lot)
2) leaving a black frame around each piece
 
When the colored paper was glued, they were then able to glue their hands onto each piece. I reminded them that the hands would not fit completely on the paper; the fingers would run over onto the black paper. Again, they were to use glue dots, so that their paper would stay neat.
 
During the next class, we began making handprints, using the opposite colors that we had already used. I had trays of paint (all 6 colors) spread out on a counter. Each tray had a brayer on it. The students had to first look at their project and figure out which hand they were going to use to paint, by placing their hand onto their paper and figuring out which one fit. Then they walked over to the counter and rolled paint onto this hand, making sure to get all of the fingertips.
 
They walked back to their table (we had a discussion prior to this about appropriate behaviors- no running, no touching anyone or anything, how to wash our hands when we were finished, etc) and placed their hand one of the white hands, to create a print.
 
They washed their hands and repeated this 2 more times until all 3 colors had been used.
 
The last step of the project was to trace their painted handprints using colored glue (I make my one using acrylic paint and white school glue). They returned back to the original colors that they had used (the construction paper), so that the glue had a good contrast to the color of the hand. Pin It

Monday, July 19, 2010

First Grade Line Monsters

Materials Needed

• Watercolor paper
• Crayons
• Watercolor markers
• Spray bottles
• Thick black markers
• Scissors
• Black paper
• Construction paper crayons
• Line poster

I did this one around Halloween time. We read the book There's A Monster in My Closet by Mercer Mayer. We looked at all of the monsters in the book. We focused on eyes, teeth, fingers, etc. Then I had each student draw their very own monster. We talked about how it needed to be larger than their hand (we didn't want any mini-monsters). They could draw as many arms, legs, eyes, etc as they wanted. It was their own creation. They traced their monster with a black marker.

We reviewed 2 concepts next: warm/cool colors and lines. They had to choose whether they wanted their monster to be warm or cool and then they filled their monster with a variety of lines: zig zag, wavy, spiral, dotted, etc using the colors that they had chosen (with crayons).

I demonstrated how to paint their monster using a wet-on-wet wash, continuing with the same colors that they were already using.

They cut their monsters out (we reviewed how to hold our scissors) and glued them onto a piece of black construction paper with glue dots ("just a dot, not a lot").

We finished the project by tracing around the monsters with construction paper crayons (they show up really well on the black paper) in the opposite color scheme than they had previously used. Pin It

First Grade Ceramic Frogs

Materials Needed

• cardboard for tables
• clay
• tools
• newspaper
• glaze

My first graders made ceramic frogs for the first time this year. We began the unit by reading the book The Icky, Sticky Frog by Dawn Bentley. The book has great illustrations of the frog and the students loved the long, sticky tongue that they could actually touch.

After we finished reading the book, we did a quick review of clay and it's properties- dries out if we play with it too much, crumbles, etc. Then I passed out a piece of clay to each of them. I demonstrated how to roll it into a ball, while I counted to 5 (this helps them know when to stop). We then made out pinch pot by sticking our thumb into the clay and then using our fingers (crab claws) to pinch around the pot to create the walls. When they had a pot, I showed them how to set the pot on its side to create a big, open mouth for their frog.

I then passed out another piece of clay and had them divide it into 4 pieces. They rolled these into tubes about the size of their finger and I showed them how to attach these to the body of their frog to create their legs.

The last part of construction was rolling a small piece of clay into a smaller tube and attaching it inside the mouth for the tongue and then rolling 2 small spheres for the eyes. These were attached on the top of the mouth.

After the frogs were fired in the kiln, I placed glaze on the tables and the students were able to glaze their frogs. Pin It

Saturday, July 3, 2010

Kindergarten Monet Water Lilies

Materials:
• Watercolor paper
• Oil pastels- take out black and brown
• Watercolor paints
• Lg watercolor brushes
• Water containers
• Green construction paper
• Coffee filters
• Watercolor markers
“Water Lilies”-Claude Monet

“Waterlilies and Japanese Bridge”- Monet


I started this project by reviewing warm and cool colors and lines (straight, zig zag, dotted, etc). Then I had the students choose whether they wanted to use warm or cool colors to draw the lines on their watercolor paper.

Each table had a basket of oil pastels on it (I purposely took out the the black, brown, pink, etc). They had to use their color scheme to fill their paper with lines.

Then I showed the students how we were going to make our lilies. I used watercolor markers on coffee filters and again, drew lines on them. Each student had 3 coffee filters that they drew lines on. When they were finished, they brought their filters to me and I dipped them into a bucket of water and they got to squeeze the water out of them and put them onto paper towels to dry.

For the 2nd class, we did a wet-on-wet watercolor wash on their background. I showed them how to use a spray bottle to spray their paper from side to side, top to bottom (I counted 6 sprays and put the bottle down). Then we dipped our brushes into water and got our cool color watercolors wet. We washed the paper with cool colors, making to sure to give our brush a bath when we wanted to change colors.

For the last class, I gave each student 1 piece of green construction paper and showed them how to cut 3 big ovals out of it. I passed out their coffee filters, which they opened up. There were lots of ooh and aahs when they saw how the colors had bled. They used glue dots to trace around the green ovals and placed these onto their background papers. Then they placed 3 glue dots in the middle of the lily pad and placed their flower on it. I had them hold it down and count to 20 to make sure it stuck to the paper.

When they were finished, we compared our art to the art of Monet. They were very excited that they looked so similar! Pin It

Friday, July 2, 2010

Prekindergarten Jackson Pollock Paintings

This was probably my favorite project that my PreK students did this year! We looked at paintings by Jackson Pollock. This was something new for them. They were used to being able to "see" something in the artwork. I heard words like "ugly", "weird", "messy". There were some very strong reactions to what they saw- exactly what I was looking for!

I put large pieces of white paper (18 x 24) on the floor. My room was covered in paper! I spread them out so that the students had enough room.

I showed the students how they were to dip their brush into the paint (for this I used fluorescent tempera) and then let the paint drip onto the paper. I stressed that I did NOT want the brush to touch the paper. This was hard for them. So I showed them how I wanted them to stand up tall over their paper and hold their brush. If they were standing up, they could not touch their paper.

I let them get started with 1 color of paint and then I started rotating around the room, switching the colors until everyone had used every color. My PreK classes come with an assistant, so I had help with this part. It was still a little crazy. I need to figure out a more organized way to switch the paint. Suggestions from anyone??

Warning! By the end of class, my floor was covered with paint. However, my little ones LOVE cleaning, so I passed out wet towels and set them loose cleaning up the floor once all of the papers were picked up. The mess was cleaned up in less than 5 minutes! Pin It

Prekindergarten Pinch Pots

For a first-time clay experience, I have my Pre-K kiddos make pinch pots. It's a great way for them to get their hands on the clay without having to worry too much about them overworking it.

I start out by giving them a piece of clay about the size of their hand (they have small hands, so the piece is not too big). I show them how to use their muscles (we get lots of giggles at this point) to squeeze the clay and make it into a ball. This is a good time to stress that it does not have to be perfect!! I usually tell them that I will count to 5 (slowly) and when I get to 5, they have to put their clay down and their hands in their laps.

Once they have made a ball of clay, I have them show me their thumbs. We stick our thumb into the middle of our ball of clay, without going all the way through- we don't want a donut!

Then I have them show me their crab claws (again, lots of giggles). We put our thumbs into the hole that we made and our fingers on the outside and pinch. I show them how thick we want the walls of our pot to be. I also show them what happens if we make our walls too thin- they bend and fall over.

When they are finished making their pinch pot, they bring them to me so that I can carve their initials and teacher's initial in the bottom.

By the next class, I have fired them (they usually take about 3-4 days to dry in my room), so they are ready to glaze.

I pour glaze into baby food jars and set 3-4 colors on each table. We talk about how our paintbrushes need to take a bath once they get dirty, so that we don't mix our paint colors. With 4 year olds, some get this and some don't. They are so excited to be painting, that I don't worry about it too much at this point. This is why I limit the colors and amount of glaze that they get. Pin It

Thursday, July 1, 2010

Prekindergarten Mondrian Lines

This is an activity that I do every year with my prekinder classes at the very beginning of the year. My main objective in this project is teaching them how to use glue dots- "just a dot, not a lot"- on their artwork. For many of my students, they have never had access to glue and the instinct is to go CRAZY with it. I try to nip it in the bud with this activity.

We look at Mondrian prints, naming the colors and shapes that we see in his artwork.

I give each of them their own white paper. Each table has a basket with strips of paper in it in a variety of lengths. I usually stick to red, yellow, blue and black, but you could change this to fit your needs.

I start with a long strip and show them how to place 6 small dots of glue on it and then place it on my paper. Then I show them how to put 3 dots on a medium strip and 2 dots on a short piece.

A great classroom management activity that ends up in some fantastic artwork! Pin It

Prekindergarten Handpainting

For this activity, my prekinder students began learning about primary and secondary colors.

To begin the project we read the book Mouse Paint by Ellen Stoll Walsh. We talked about the 3 colors of paint that the mice jumped into (primary) and the 3 colors that they made when they danced in the paint (secondary).

Each student had a piece of watercolor paper and traced their hand at least 5 times (more if they could fit it). We talked about not letting the pencil touch their fingers so that they didn't get skinny fingers.

When it was time to paint, I had 1/2 of my tables set up with primary color tempera cakes and the other 1/2 set up with secondary tempera cakes. They chose a table to sit at and used the colors on that table to paint ONLY their hands.

For the next class, I put the tempera cakes out again, but this time I helped them look at the colors that they had already used. If they had already used red, blue and yellow, then they had to sit at a table with orange, green and violet and vice versa. For this part, they were painting the background of their paper. Pin It

Kindergarten Bluebonnets

The rodeo project that I do with my kinder classes is another bluebonnet project. I do this one after we have studied different types of lines and warm/cool colors. We begin the project by looking at VanGogh's Sunflowers. We look at the different parts of his painting: the vase, the flowers, the stems.

We start our project by making the vase. The students choose the colors that they want to use for their vase (either warm or cool). They get a 1/2 piece of paper and fold it in 1/2. The draw a line from 1 side of the fold to the other side of the fold and then cut it out. When they open the paper up, this is their vase. They decorate their vase by creating patterns using lines in their chosen colors. They glue this onto a larger piece of paper (also in their chosen color) using glue dots.

They draw flower stems with either a green crayon or oil pastel.

During the next class, they add the flower petals for their bluebonnets. I put tempera cakes on each table. They get blue and either white, cream or yellow. I showed the students how to use 1 finger only to dip into a tub of water and then rub in the paint. They use this finger to create fingerprints along their flower stem.

When they finish making the blue petals, they add highlights to the flowers by dipping their finger into the lighter color (white, cream or yellow) and making a print on top of the blue print. Pin It

PreKinder Matisse Animals

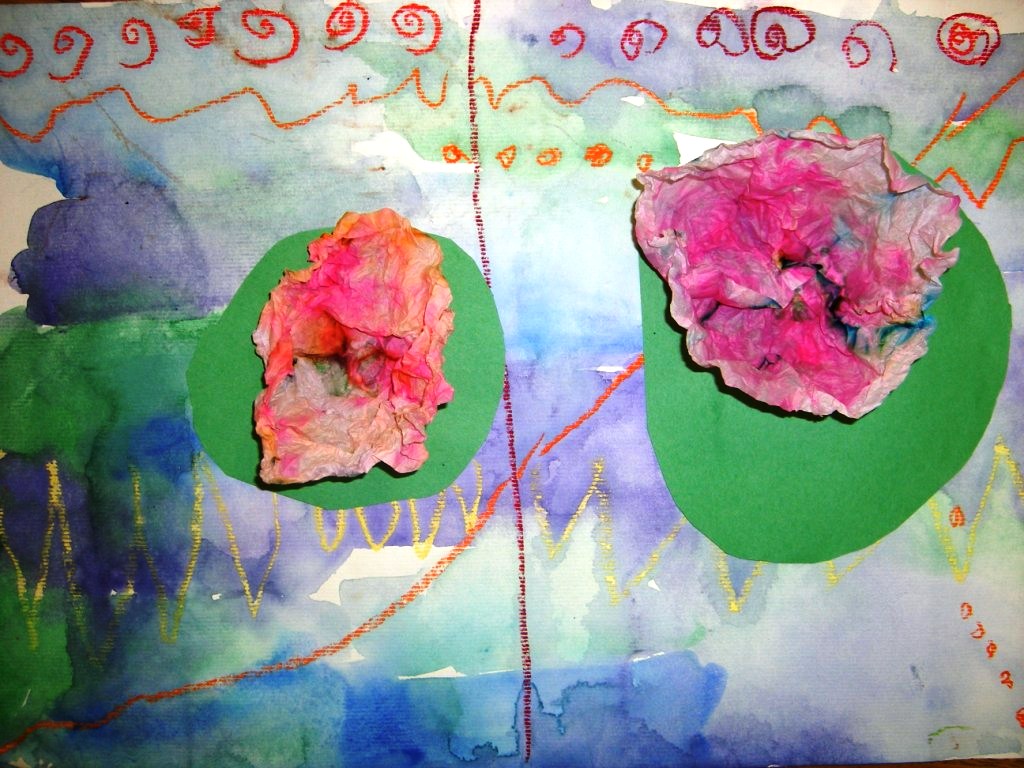
For this project, we started with the background paper. I gave each table pieces of colored tissue paper. (Make sure that it is NOT the bleedless tissue paper. You want the color to transfer to the background.) Each table had bowls of vinegar and paintbrushes. The students put pieces of tissue paper on their white background paper and brushed the tissue with vinegar. They covered the entire paper with colored pieces of tissue paper. We put these up to dry for the next class.


For the next class, I read the book Brown Bear, Brown Bear to the students.
We talked about the different animals in the book and the shapes that are used
 to draw them. Each student chose 1 animal to make using die-cut construction
paper shapes. I reminded them how to apply glue using dots and they got to work.

When their animal was finished, they used crayons to decorate their animal. Pin It

PreKindergarten Torn Paper Bluebonnets

In Houston, a big part of our fall semester is spent preparing for our annual Houston Livestock and Rodeo Exhibit. I have each grade level work on a project for this big event.

My prekindergarten students made Torn Paper Bluebonnets this year. It was the first year we did this project and they turned out beautiful!

We started the project by doing a wet-on-wet watercolor background. The students used spray bottles to spray a piece of watercolor paper with water. Then we used liquid watercolors and dropped color onto the paper using an eye dropper. For this particular project, we were learning about warm and cool colors, so we used warm colors on the background.

The students loved watching the colors bleed into each other!

We repeated the same process on a smaller piece of paper for the flowers. However, this time, we only used blue (cool colors).

By this point, the first session was over and we left the papers out to dry.

For the 2nd session, the students worked on tearing the blue papers into little pieces. I showed them the size we wanted (about the size of a quarter) and they set to work. By the end of the class, we had a flurry of blue flower petals all of over the room!

For the 3rd session, I had patterns for the vase ready to go. The students traced the pattern onto a piece of wallpaper (adding texture to their picture) and cut it out. They glued these at the bottom of their paper and added 3-5 strips of green constructions paper for the stems.

Then they started gluing flower petals onto the stems to finish off their Texas Bluebonnets.

I only meet with my Prekinder classes for 15-20 minutes, so I needed to break the project up into very short increments. It took us 3 classes to get them finished. Pin It