Showing posts with label drawing. Show all posts

Monday, December 10, 2012

Fifth Grade Pagodas

I adapted last year's pagoda lesson to allow for more choices on the part of the students. They were able to choose between printing, drawing and sculpture.

The printing project was the same project that was completed last year: Pagoda Printing

For the drawing project, the students drew the pagoda they wanted. I had them trace their composition with a black Sharpie and then they colored them using Crayola Color Sticks. For this project, I did a lesson on basic shading. They decided where they wanted the light source to come from and then used the Color Sticks to create light and dark areas in their building.

The sculptures were made out of 100% recycled materials: cardboard, bottle caps, cork.... basically if they found something they wanted to use, they went for it. Then the used tempera cakes to paint them. I think next year, we might try acrylic. The tempera didn't have the vibrancy that I was looking for.


Pin It

Thursday, October 18, 2012

Fifth Grade Mandalas

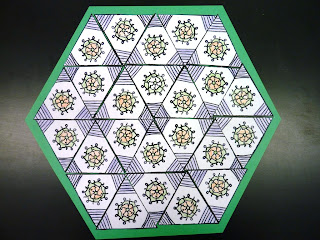
I have done this mandala lesson for a couple of years, but have adapted it this year to allow the students some choice in their final product.

Here are some examples from previous years:

Fifth Grade Mandalas

I start out by showing the students this PowerPoint I found:


The students then had to plan their project in their sketchbooks. I had them decide on which project they wanted to do:

folded paper (to create 8 sections)
folded paper with a CD in the middle
print
hexagon

They had to decide if they were going to use geometric or organic shapes for their design and then which color scheme they wanted to use: primary, secondary, complementary or monochromatic.

While they were working on their plans, I began meeting with each group and helped them get started with the initial steps in their projects- folding paper, using compasses, dividing up their Styrofoam for their prints, etc.

As the project progressed, I met with the different groups to discuss their next step. How they needed to add color- using markers, Color Sticks, crayons, ink, etc.; how to build their hexagon, etc.

The students seemed to really enjoy that their projects had the chance of being completely different than everyone else in the class. I am really hoping that as we go along, they will start to think outside of the box and present ideas to me as to what they would like to do.


Pin It

Monday, February 20, 2012

Fourth Grade Ndebele Dolls

I found this project on Artsonia. It is a project that Linda Welling at Cedar Creek Elementary posted. Funny thing is, I found this PowerPoint to show to my students and it is also from Linda Welling! I added in the YouTube video on the last slide.
I also found this great book, Ndebele: The Art of An African Tribe by Margaret Courtney-Clark. The book has some great pictures of the Ndebele people, their art and the dolls.

Fourth grade continued their tour of Africa by working on an Ndbele doll. They learned about the bead work and artistry of the Ndebele people. I showed them a doll that I had purchased and then they began their own designs in their sketchbooks.

They had a lot of fun with this one. It's been awhile since we have done a simple drawing project. We have been doing a lot of printmaking, collage and sculpture projects, so this was a return to basics for us.

The children decided what they wanted their doll to look like. My only requirement was that, like the Ndebele, they needed to have
at least 3 patterns somewhere on the doll.

Once the design was ready, they drew it on a large piece of drawing paper and traced it with black marker.

Now the fun part!!! They got to use Crayola Color Switcher markers. The majority of my students do not have art materials at home. The only time they get the chance to create is when they are in my room, so when they used the Color Switchers.... you would have thought I hung the moon!

Even better, they liked them so much, that they took better care of them than any other materials we have used thus far!!


Pin It

Monday, August 1, 2011

Tall Tales- Iggy Peck, Architect

Our next book in the summer art program was Iggy Peck, Architect by Andrea Beaty and David Roberts. Iggy Peck is a very creative and independent little boy who has a passion for building things with whatever materials he can find: food, dirty diapers (that got a lot of giggles from the children!), dirt, etc. However, when he gets to the second grade, his teacher tells him that he cannot build anymore! The class goes on a field trip and Iggy's building skills save the day!

The projects that we worked on this week, all had to do with architecture.

The 2-5 year olds made paper bag houses. They started out with lunch sized paper bags and filled them with newspaper. The top was folded over and stapled. They covered the top with a folded piece of paper to make it look like a roof. The bag was then glued onto a recycled piece of cardboard, to create a base. From here, the children had a wonderful time cutting, gluing, adding texture (I brought in some texture plates and let them add texture to construction paper) and going crazy creating their houses. We had beach houses, mansions, crooked houses, etc.


The 6 and 7 year olds traveled to Egypt and made sugar cube pyramids. They heard the word sugar cube and got very excited! They started out by gluing a 6 x 6 grid of cubes onto a paper plate. Then added a 5 x 5 grid on top of that, then 4 x 4, continuing to decrease until they got to a single cube at the very top. I found that tacky glue worked better on this than regular school glue. It was a lot sturdier and held the cubes in place better.

When they were finished gluing the cubes, one of our high school volunteers took the children outside and we use spray stain (I will never go back to brush on stain again!!!) and they sprayed them light brown, making them look like they were built in the desert. Then they got to add fun details: palm trees, camels, people, etc. using any left over craft materials that we had from the previous weeks.

The 8 year olds did a lesson that I found on the  Deep Space Sparkle blog. I bought her "Architecture Made Easy" lesson guide for $5. It's a downloadable PDF file, so you just save it right to your computer and then open it any time you need a lesson. Affordable and easy! Architecture Made Easy- Deep Space Sparkle.The lesson that the children did was the castles. I started out by having a few rectangle templates ready for them to trace onto their drawing paper (usually, I don't go in for templates for my older students, but since this was a 1 time, hour class, I went ahead and did it to allow the children more time to finish the castles). Once they had the rectangles traced for the front of the castle, the turrets, etc, then they began adding details: bricks, windows, drawbridge, flags and banners, etc. They traced the entire drawing with a permanent black marker and then used crayons and colored pencils to color them in.


Pin It

Thursday, November 4, 2010

Fifth Grade Reptiles

Materials Needed

· 9 x 24 black paper
· pencils
· erasers
metallic markers


Resources:
Chameleon's Colors Chisato Tashiro
Visuals of chameleons, iguanas and other reptiles

I started this project by reading Chameleon's Colors by Chisato Tashiro to my fifth grade students. Then the students had to draw a reptile that incorporated at least 3 pattterns, 2 visual textures.

In their sketchbook, they practiced drawing a reptile, including a branch for it to sit on. Then we talked about the different patterns that we could use for different sections of the reptile.

When they were ready, they drew their reptile on a piece of black paper and sketched in the different sections.

They added color by using metallic markers. Pin It