Showing posts with label liquid watercolor. Show all posts

Wednesday, June 17, 2015

Tall Tales and Art- Summer 2015 (Day 5)

Yesterday's class was cancelled due to Tropical Storm Bill. Our district was shut down as a precaution, as they were expecting us to get hit with a lot of rain, wind and flooding here in Houston.

So skip forward to today's class. The turnout was pretty low. There was still a lot of rain in the area, but overall, we weren't hit nearly as bad as we were Memorial Day weekend.

Today's book was Dinosaurs Love Underpants by Claire Freedman.

We had 3 dinosaur activities for the children to do with their parents:

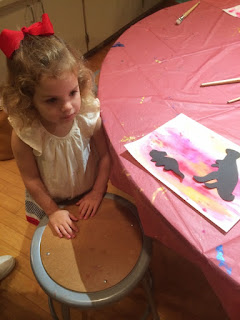
Activity 1:  Dinosaur watercolors
The students created a wet-on-wet background using liquid watercolors and water. They used dinosaur templates (not usually my cup of tea, but for a program like this, the parents are much more comfortable with them) to trace the dinosaurs onto black construction paper. These were then cut out and glued onto the watercolor background.


The children mixed baking soda and food coloring together in a bowl, until the baking soda had taken on the color they wanted. Once they had the color they wanted, they added about 1-2 tbsp of citric acid to the mixture and stirred it really well. The oil was added at the end to create a paste that could be molded around a small plastic dinosaur. The eggs were placed into ziplock bags to take home, where they can sit for the rest of the day to harden. Once the egg is hard, they can be placed in a tub of water. The eggs will start to foam and dissolve, "hatching" the dinosaur.


Activity 3: Volcanoes/lava lamps

The children were asked to bring an empty water bottle with them. We had pitchers of water on the table and they filled the bottle 1/3 full with plain water. Red food coloring was added (they made the red as bright as they wanted... I had bought a large bottle, so we had plenty) to the water. Then vegetable oil was added to the water (1/3 bottle). The bottles were left to sit for a couple of minutes so that the water and oil could separate. Once it was separated, the parents added broken up pieces of Alka Seltzer to the bottles. This caused the red water to start bubbling into the vegetable oil, creating the effect of the volano.

****Note- Since Alka Seltzer has aspirin in it, I made sure that the children did not handle this. The parents were in charge of adding the Alka Seltzer to the bottles.


Pin It

Wednesday, July 9, 2014

First Grade Rousseau Jungles


 First grade looked at a variety of prints by Henri Rousseau. They focused on how the animals seemed to be hidden in the foliage of the jungle.

Then we read the book, Who's the Beast by Keith Baker.

I put out a variety of old calendar pages with animals on them and asked them to practice drawing just the head of the animal. We talked about making the drawing bigger than our hand, so that it would fill up the space.

Once they had the head drawn, I showed them how to draw different plants to make it look like their animal was hiding in the jungle. The plants had to touch the edge of the paper, as well as touch the head of the animal. I also showed them how to draw plants all around the page (top, bottom, and both sides).

 When they had their drawing the way they wanted it, I showed them the 3 choices that they would have for their project:
1.  black glue with liquid watercolor
2.  muslin, glue and liquid watercolor
3.  marker

Black glue with liquid watercolor
I gave the students a piece of watercolor paper (9x12). They drew their jungle scene with pencil first.

Then they traced all of the lines with black glue (school glue mixed with black acrylic paint).

Once the glue was dry, I put out trays of liquid watercolor. We started with the plants first, so I gave them a 3-4 different shades of green to use. The black glue helped stop the paint from bleeding.

We then moved on to our animals. I told them that since they were the artist, they did not have to paint their animal using realistic colors. If they wanted a pink giraffe, they could make a pink giraffe.


The last step was painting the background (all of the space that was left over). My one qualification for this was that I didn't want them to use a color that had been previously used.


 Muslin, glue and liquid watercolor
For this project, I had pre-cut the muslin into 9x12 pieces.

The students used a pencil to draw their picture onto the muslin first.

Then they traced over the lines with white school glue.

When the glue was dry, they used the same watercolor procedure as the black glue project.

Once the entire project was dry, the glue was peeled off of the muslin.

***This is where we had technical difficulties. The glue was very difficult to peel. I ended up having to peel the majority of it. I tried washing the muslin under water to loosen the glue, but that DID NOT WORK! The glue got very sticky and all of the color washed out of the muslin. Ugh!!

Any suggestions on how to fix this?????????


Marker
I gave the students a 9x12 piece of drawing paper. Again, they drew their image with pencil first.

They traced over the pencil with black marker and used an eraser to erase the stray pencil lines.

In my room, I have all of my markers sorted into stackable plastic tubs by color, so for this part, I pulled out the green marker tub. They used any other the green markers that they wanted to color their plants.


 The animals were colored with any colors that the children wanted.

The sky was filled in with a color that they had not previously used.

Overall, I was very pleased with how these turned out. The students did a really good job overlapping their plants and animal and we are finally getting the concept of drawing big!


Pin It

Wednesday, October 2, 2013

1st Grade Picasso's

I had such success with the first grade Picasso's last year, that I did not change the project for this year.

We looked at a variety of portraits painted by Picasso and then drew our own. The students were allowed to choose if they wanted to use liquid watercolor, oil pastels or Crayola Color Sticks.

See last year's post for more info: 2012 Picasso Portraits

Here are examples of this year's finished products:


Pin It

Tuesday, June 25, 2013

Tall Tales- Cave Baby

Today's book was Cave Baby by Julia Donaldson and all of our projects centered around cave art.

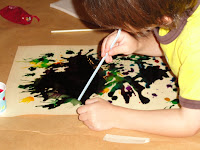
For our younger children, we did ink blot painting. I had liquid watercolors, eyedroppers and straws. I had the parents help the children drip the paint onto the paper and then the children used the straw to blow the paint around the page.

This was probably my favorite project today. If I could have gotten away with it, I would have taken a few of the paintings home to frame! I absolutely love the vibrant colors of the liquid watercolors! The children loved it, too, because many of them had never used this medium before.


The next age group did stencil paintings. They cut out shapes from manila paper. Some cut out their hand print (since we had been talking about cave paintings). Others got creative and cut out the letters for their names. They placed their stencils onto their papers and were then given paper plates with neon tempera on them. They used toothbrushes that I had bought at Dollar Tree (5 pack for $1) and splattered their papers with the neon colors.  When they had finished spattering their papers, they pulled off their stencils and they were left with the outline of their images.


The got creative about how they were getting the paint onto their paper.


This little girl decided that her hands were a work of art by themselves!


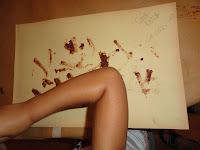
And our last activity of the day was creating cave paint with dirt. Cave Paint
I brought in potting soil and vegetable shortening. I gave the children a cup and a spoon. They added dirt and vegetable shortening to their cup and mixed it together. Once they had the consistency they liked, I added a little bit of paint (giving them a little variety in their color). I gave them a choice between black, white and brown. They mixed that up and then used paint brushes, spoons and some even used their fingers to paint their cave paintings onto their paper.

This was a hit!!!! Even the parents liked this one. None of the children had done an activity like this before, so they were fascinated by creating their paint out of dirt.


Pin It