Showing posts with label pinch pot. Show all posts

Tuesday, July 19, 2011

Fourth Grade Egyptian Canopic Jars

 Fourth graders are fascinated with ancient Egypt (as am I!). In the past, I have had them make pharaoh's masks, which have turned out pretty well. This year, I decided to switch it up a little bit and we made Canopic Jars. To begin the project, we discussed what canopic jars were- jars that held the internal organs of the deceased. That really caught their attention! Of course, then they had all kinds of questions- how did they get the organs out, why did they remove the organs, what did they do with the body. This naturally led into a great research opportunity for the students.


We learned that there were traditionally 4 different canopic jars: jackal, falcon, baboon and human. Each one held a different organ. The human jar held the liver, the baboon jar held the lungs, the falcon jar held the intestines and the jackal jar held the stomach.

We looked at a variety of different canopic jars that I found in books and on the internet. This helped give the students an idea. Then they designed their own jar and drew it in their sketchbook.
 When their designs were ready, I gave them a good sized ball of clay and had them make the jar (a basic pinch pot was what we used). We tried to make the walls fairly high- when I do this next year, I think that we will do a coil pot instead of a pinch pot. This will allow the students to make their walls a lot higher.

They used their clay tools to scratch a variety of patterns into the pot and I scratched their initials and class code into the bottom when they were done.

Before making the lid of their jar, I showed them a couple of YouTube videos that I had found. These videos were geared toward middle school students, but the fourth graders did a really good job following what was demonstrated.


I gave them a second ball of clay and they made the lid for their jar.

Once both pieces were ready, I fired them and had them ready for our 4th class.


During our fourth class, I pulled out pretty much every color of glaze that I had and let them glaze both pieces. I also had them glaze the inside of each piece.

I fired them one last time and I have them all sitting in my storage room right now. These beautiful pieces will be my beginning of the year art display in August. I can't wait to show off what they created!


Pin It

Thursday, June 23, 2011

Second Grade Ceramic Birds

 One of 2nd grades big science units is Birds. So- we made ceramic birds!

I actually got this idea from a fellow art teacher in my district.

We started out by learning about John James Audubon. I couldn't find a book that was at a 2nd grade level, so we only got to look at artwork.

Then I had the students practice drawing different kinds of birds in their sketchbooks, focusing on the forms (cones, cylinders, spheres, etc).


The next week, was clay week! This in probably the students favorite time of the year. They look forward to clay and are constantly asking when we are going to do our clay project. So they were ready to go!!!

I gave them 2 pieces of clay and had them make 2 pinch pots (reminding them that we had made pinch pots when we were in kindergarten).

Then I showed them how to connect the 2 pots together by pulling the clay with their thumb from 1 pot to the other.
 Then they used their wet hands to smooth the form into a sphere. Some went with more of an ovoid shape (they wanted to make penguins).

I had them take their pencil and poke a hole in the bottom. We had a discussion about how the clay needed the hole so that it wouldn't explode in the kiln. They thought that was cool, until I explained that if 1 exploded, it would break the others around it- not so cool anymore!


I gave them a third piece of clay to make wings, head, beak, tail and any other features that they wanted to add to their bird.

I showed them how to score their pieces and we talked about what would happen if they were not properly attached.

As they finished them, they brought them to me, I used a paperclip to carve their initials and class code into the bottom and set them on their shelf to dry.
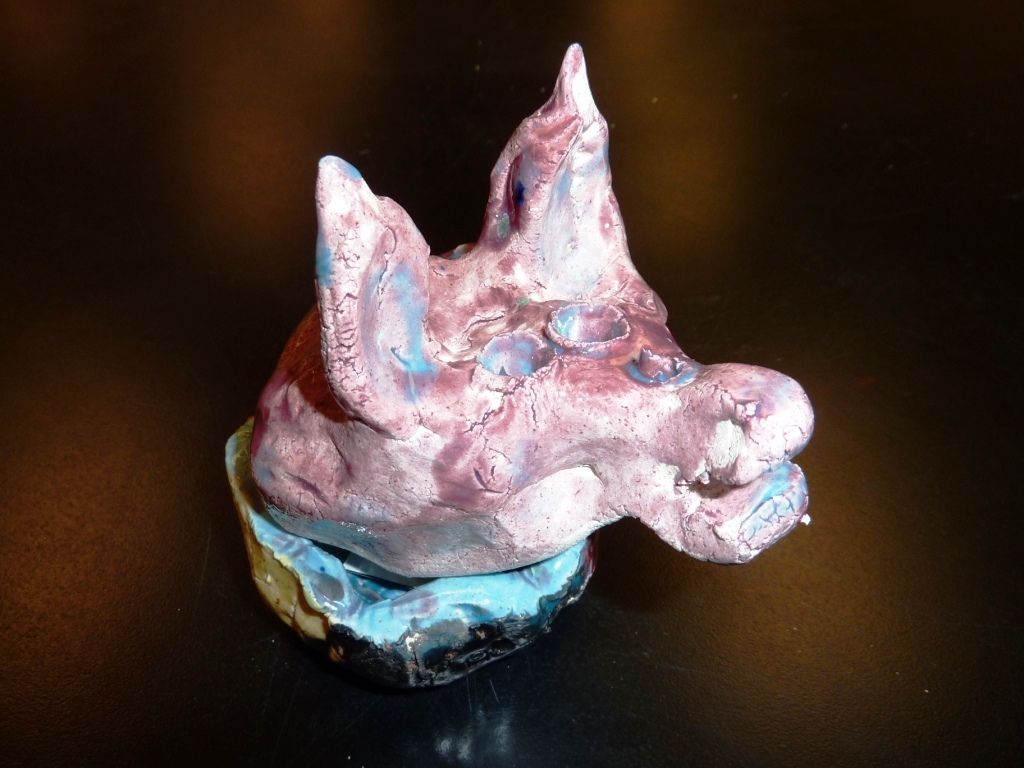
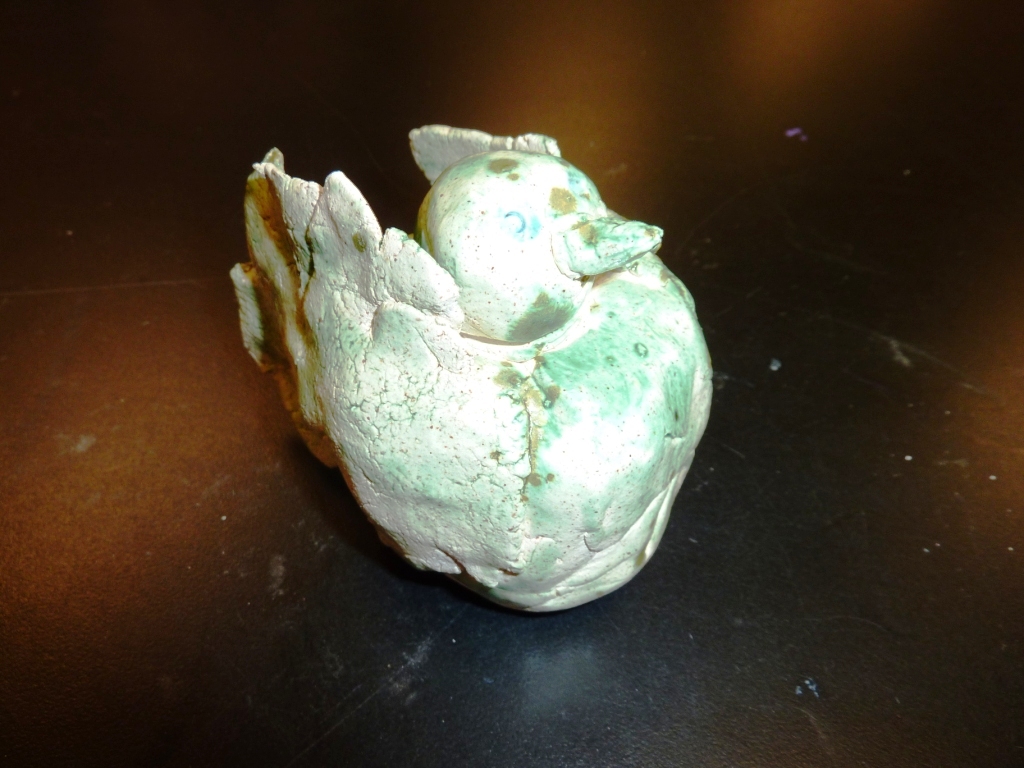
I fired the birds and then they were ready to glaze. For glazing, I had egg cartons that I had cut in 1/2 on each table. I tried to give each table a different combination of colors so that they would all look different.
Pin It

Friday, June 17, 2011

Kindergarten Mother's Day Pots

 The usual clay project for my kindergartners is a pinch pot. I have done different things with the basic pinch pot in the past (bird nest, bowls, etc). This year, we made them into "vases" for Mother's Day.

We made the typical pinch pot out of a piece of clay. We used the words walls, base and mouth when talking about our vase.

Some of the students got adventurous and even tried to make theirs into the shape of a heart. What mom wouldn't love to get one of those!

I fired the pieces once they were finished so that they would be ready to glaze for the next class time.
 When the students came in the next week, I had placed egg cartons on each table (I had cut them in 1/2, so they had 6 spaces). I had already filled the cartons with colors.

We went over the rules for painting: rinsing our brushes, filling then entire space with color, etc.

I also added in that I wanted them to glaze the entire "vase" EXCEPT for the bottom (this is where I had put their initials). I showed them how they could leave their vase sitting on the table. If it was touching the table- they didn't need to glaze it.
 I gave them the entire class time to glaze their vases. Most of them decided to paint a pattern around the outside of their vase- kinder had been spending a lot of time on patterns and this had transferred over to our art room. Fantastic!!!
The last step, was to take decorative marbles (the kind that you put into dishes on your coffee table or into fish bowls- I found them at the dollar store!) and place them into the bottom of their vases. Most of the vases only needed 1 large marble, some needed 2.

When I fired the vases the last time, the marbles melted and cracked, giving the vases a unique look that the students loved.

We wrapped them up with tissue paper and ribbon and they took them home just in time for Mother's Day!

Pin It

Wednesday, August 4, 2010

Fourth Grade Spirit Rattles

Materials Needed

• Clay- preferably red
• tools
• glaze
• small pieces of fired clay- to place inside rattle
Arrow to the Sun: A Pueblo Indian Tale

Fourth grade read the book Arrow to the Sun: A Pueblo Indian Tale. They discussed different types of rattles- baby rattles, maracas, native American rattles, etc.

They planned their rattle by drawing a sketch of what they wanted it to look like in their sketchbook. I had a variety of Native American resources on hand for them to look at, including resources that explained the symbology that is used.


When they were ready, they were given a ball of clay. They formed this clay into a pinch pot. They put pieces of already fired clay into the pot and then made another pinch pot. The pots were attached to create a sphere. Some students stepped outside of the box and made different shapes than spheres. I had hearts, stars, cubes, but the majority ended up being spheres.

A handle was formed out of more clay.

The students added textures to their rattles with different tools and texture plates.

After the rattles were fired, they were glazed. When we were glazing, we talked about how they didn't have to cover the entire rattle with glaze. The beautiful red clay could show through. They could use the glaze to highlight the designs and textures that they had created in their rattle.

We then covered the entire rattle with clear glaze and I fired them one last time. Pin It

Monday, July 19, 2010

First Grade Ceramic Frogs

Materials Needed

• cardboard for tables
• clay
• tools
• newspaper
• glaze

My first graders made ceramic frogs for the first time this year. We began the unit by reading the book The Icky, Sticky Frog by Dawn Bentley. The book has great illustrations of the frog and the students loved the long, sticky tongue that they could actually touch.

After we finished reading the book, we did a quick review of clay and it's properties- dries out if we play with it too much, crumbles, etc. Then I passed out a piece of clay to each of them. I demonstrated how to roll it into a ball, while I counted to 5 (this helps them know when to stop). We then made out pinch pot by sticking our thumb into the clay and then using our fingers (crab claws) to pinch around the pot to create the walls. When they had a pot, I showed them how to set the pot on its side to create a big, open mouth for their frog.

I then passed out another piece of clay and had them divide it into 4 pieces. They rolled these into tubes about the size of their finger and I showed them how to attach these to the body of their frog to create their legs.

The last part of construction was rolling a small piece of clay into a smaller tube and attaching it inside the mouth for the tongue and then rolling 2 small spheres for the eyes. These were attached on the top of the mouth.

After the frogs were fired in the kiln, I placed glaze on the tables and the students were able to glaze their frogs. Pin It

Friday, July 2, 2010

Prekindergarten Pinch Pots

For a first-time clay experience, I have my Pre-K kiddos make pinch pots. It's a great way for them to get their hands on the clay without having to worry too much about them overworking it.

I start out by giving them a piece of clay about the size of their hand (they have small hands, so the piece is not too big). I show them how to use their muscles (we get lots of giggles at this point) to squeeze the clay and make it into a ball. This is a good time to stress that it does not have to be perfect!! I usually tell them that I will count to 5 (slowly) and when I get to 5, they have to put their clay down and their hands in their laps.

Once they have made a ball of clay, I have them show me their thumbs. We stick our thumb into the middle of our ball of clay, without going all the way through- we don't want a donut!

Then I have them show me their crab claws (again, lots of giggles). We put our thumbs into the hole that we made and our fingers on the outside and pinch. I show them how thick we want the walls of our pot to be. I also show them what happens if we make our walls too thin- they bend and fall over.

When they are finished making their pinch pot, they bring them to me so that I can carve their initials and teacher's initial in the bottom.

By the next class, I have fired them (they usually take about 3-4 days to dry in my room), so they are ready to glaze.

I pour glaze into baby food jars and set 3-4 colors on each table. We talk about how our paintbrushes need to take a bath once they get dirty, so that we don't mix our paint colors. With 4 year olds, some get this and some don't. They are so excited to be painting, that I don't worry about it too much at this point. This is why I limit the colors and amount of glaze that they get. Pin It