Showing posts with label Aztec. Show all posts

Wednesday, February 12, 2014

Second Grade Aztec Suns

Continuing with our Latin American projects, second grade did suns inspired by the artwork of the Aztecs.

Everyone began the project by drawing their idea for a sun in their sketchbook. They had to make sure that their drawing was large (one of my focuses for my 2nd graders this year- they love drawing everything tiny!), that it had a variety of patterns and that it used 1 color scheme (they chose from warm, cool or complementary colors.

Once they had finished their preliminary sketch, they chose which project they wanted to work on.

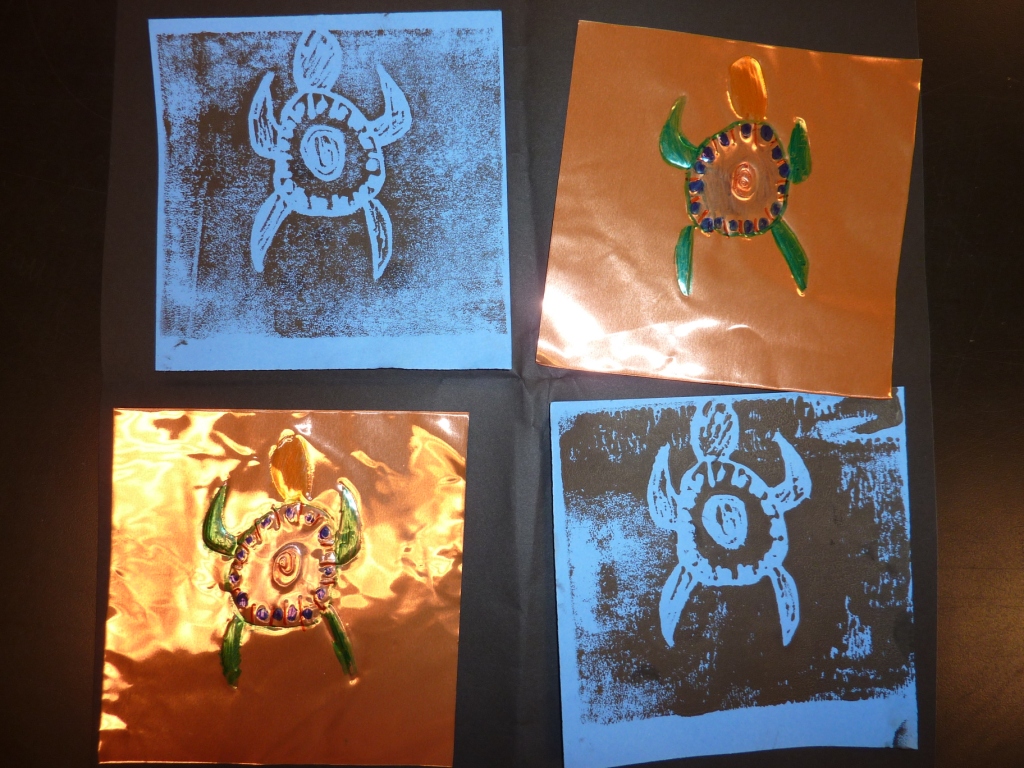
Their first choice was an aluminum bas relief. They drew their sun on a piece of manila that was cut to the size of the aluminum (5 x 5). Then they taped the manila onto the foil and traced the design. They were told to do the tracing while the aluminum was sitting on top of their sketchbook, so that it would leave a nice impression. After tracing, they removed the manila and used their pencil to color in certain sections of their design, creating the bas relief. Color was added with Sharpie markers and then the aluminum was stapled to a piece of black construction paper to create a matt.

The second choice was a printing project. The students drew their design on a piece of 5 x 5 manila paper. They taped this onto a piece of styrofoam that had been cut to the same size. Once the design had been traced, they removed the manila and used their pencil to color in certain sections. They chose pieces of construction paper that fit their color scheme and printed their design onto the paper. The prints were glued onto black construction paper to create a matt.


The third choice was a sculpture project. The students used recycled materials to create a sculpture of the sun that they had drawn in their sketchbooks. I have a variety of boxes outside of the artroom where the faculty can drop off their recycling. I have egg cartons, boxes, newspaper, bottle caps, lids, containers, cardboard rolls, magazines, etc. The students have gotten used to going to these bins anytime they are in need of materials. 

The students collected the materials that they wanted for their sun and stored them in a zip-lock bag. They were glued onto a piece of cardboard (saved from packs of construction paper that the teachers get with the students school supplies at the beginning of the school year) with craft glue (Elmer's is not strong enough for this project). When everything had been glued in place and was dry, they used markers and tempera to color it in their color scheme. The last step was to add details by gluing sequins onto the sculpture.


Pin It

Saturday, November 24, 2012

Second Grade Aztec Art

The projects from last year: Second Grade Aztec Art

This year's project added a couple of choices for the students:


1.  copper repousse by itself


2.  printmaking


3.  copper repousse and printmaking together

I stressed to the students that those that opted for choice 3 would really have to stay focused, since they would have a lot more to do to complete their project than the other options.

From there, we began our project by creating 2 practice drawings in our sketchbooks, after having read the book, Musicians of the Sun. They were allowed to create a drawing based on one of the characters and stylize it as they saw fit.

We learned about complementary colors and they colored their sketches.

They chose 1 of their drawings and copied it onto a piece of 5 x 5 manila paper, without coloring it.

As they were doing this, I began meeting with small groups to demonstrate the steps for each different project.

Project 1:
They taped their manila paper to a piece of copper and traced the design. I made sure that they knew they had to place their copper/manila paper on top of their sketchbooks in order for the design to come through.

Then they took their manila paper off and used their pencils to color in different parts of the positive space, making these "pop out" of the copper- lots of oohs, aahs and Wows! during this stage.

They used Sharpies in their chosen complementary colors to color their design and it was glued onto a piece of black construction paper.

Project 2:
The manila paper was taped onto a 5 x 5 piece of Styrofoam. The design was traced with their pencil.

Then they took their manila paper off and used their pencils to color in different parts of the positive space (same as the copper project).

They picked up 4 pieces of construction paper (2 of each of their complementary colors) and went to my printing station. They created 4 prints that were exactly the same and set them on the drying rack to dry. The next week, they came in and glued these onto a piece of black paper.

Project 3:
This was a combination of the 2 projects. I had them start with the Styrofoam. However, instead of creating 4 prints, they only created 2. When these were completed, they used the exact same piece of manila paper with their design on it and taped it to a piece of copper. They followed the steps for the copper project, however, they had to create 2 pieces of copper instead of only 1.

All of their pieces were glued onto a piece of black paper.


All in all, giving the second graders these choices worked pretty well- better for some classes than others, but as a whole, well. I think it will work much better the next time, because they will be used to making their own choice, reading directions and problem solving, instead of depending on me to give them all of their answers.

Pin It

Thursday, June 23, 2011

Second Grade Aztec Art

 This project was pretty much the same as the the third grade Illuminated Initials that I do, however, the second graders get a much smaller piece of copper. I really love the effect of the copper and the permanent markers.

I start this project out by reading the book Musicians of the Sun by Gerald McDermott to the classes.

While I am reading, I have the students focus on:
1)  the characters in the book (Night, Sun, Wind, Turtle Woman, Alligator Woman, Fish Woman)

2) lines and shapes used in the illustrations

3) colors used in the illustrations

After I am finished reading, I show them a PowerPoint that I put together with symbols for each of the the characters from the story. We talk about the Aztecs and where they were from. The majority of my school is from Mexico, so they absolutely LOVE this part!

Then they get to choose the character that they would like to illustrate.
I give the students a piece of 5 x 5 manila paper (the same size as the copper that they will get later on). I have them draw their character on the paper with the following rules:

1) it must touch all 4 sides of the paper (easier for some students than others)
2) it must have at least 1 pattern (using either shapes, lines or a combination of both)


When they finish drawing their character, they get a piece of copper and tape. I have them tape the manila paper onto the BACK of the copper (the copper is 36 gauge. It is copper on 1 side and silver on the other. I have them tape the manila paper to the silver side)

The place the copper with their drawing on top of their sketchbooks and trace their picture. For this part, we joke about how they have to use their muscles so that the picture will come through to the other side. The spend a lot of time flipping back and forth so that they can see it as it develops.

The students leave their picture taped onto their copper. I have them use their pencil and they color the image. The do not color their patterns.

When they have finished coloring their image, they flip it over and color the pattern on the copper side (this presses the pattern into the copper).

When they are completely finished, they have a bas relief of their Aztec image.

They use Sharpie markers to color the images. In the past, I have done a color lesson at this point, but I have found that letting them have freedom to use any colors makes for more dramatic end results.

These turned out so well, that I chose 1 from each of my 2nd grade classes to take to an art auction. I had them framed and it sold for almost $100. Pin It