Tuesday, August 2, 2011

Tall Tales- A House for Hermit Crab

  Our last summer session was based around the book A House for Hermit Crab by Eric Carle. "Time to move," said Hermit Crab one day. Hermit Crab has grown too big for his shell and must find a new home. He finds a newer, bigger shell, but it is very plain! He meets some sea anemones and asks them if they want to decorate the outside of his shell. He eventually covers his new home with a colorful sea star, some coral, a sea snail, a sea urchin, and a lantern fish. However, by the time he gets his home just the way he likes it, he has outgrown the shell again! I absolutely love using Eric Carle's books in my classroom and this one was no different.
The 2-5 year olds made their own hermit crab out of a paper plate and a tracing of their hand (see Kids Count 1234 for this lesson and more). The caregivers helped the little ones trace their hand onto a piece of construction paper and then cut it out. This became the hermit crabs body. They glued it onto a piece of white drawing paper and added details to their crab. Then they glued a paper plate onto the paper, for the crabs shell. To decorate, I pulled out all of the leftover craft materials from the previous weeks (sequins, scrap paper, pipe cleaners, silk flowers, etc) and they glued this all over
their shell. I also had real seashells that they could use in their collage.

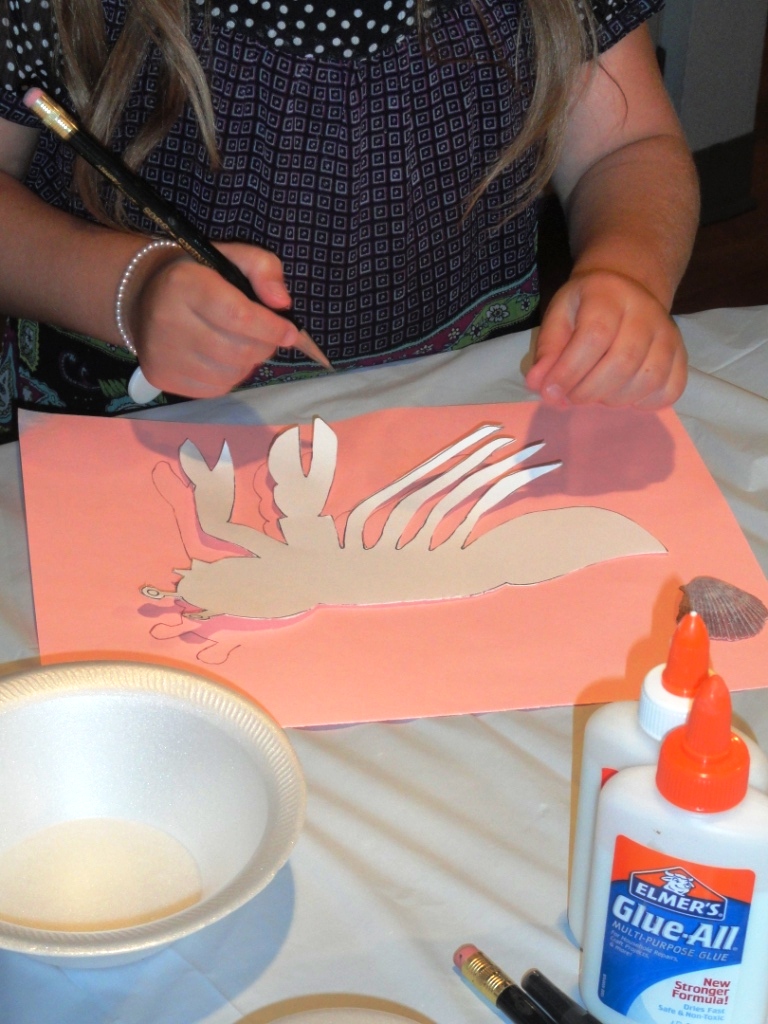
The 6-7 year olds also made a hermit crab, but they used a template to trace the body (see Lesson Plan Source for this project) and a Styrofoam bowl for the shell. The students traced the template onto a piece of colored construction paper and then cut it out. They glued the crabs body onto a
piece of white drawing paper and then glued a Styrofoam bowl onto it for the shell. The painted a layer of glue onto the bowl with a paintbrush and then sprinkled sand onto the bowl. They used the same leftover materials that the 2-5 year olds used to decorate their crab shells. I also gave them real shells to add embellishments.

The 8 and up group made their hermit crab out of Crayola Air Dry clay and real shells. They were shown how to use the clay to form the crabs body, claws, antennae and then place it inside of the shell that they had chosen. Some

 children went all out and made sea turtles, snails, etc using the clay and shells. When they had finished making their sea creature, there were blow dryers available to help dry the clay. Each table was given a variety of different tempera paints and they decorated their creature and the paper plate that they were sitting on. We had some wonderful ocean scenes! We also made some of our leftover craft materials available for those who really wanted to get into it.
Pin It

Monday, August 1, 2011

Tall Tales- Iggy Peck, Architect

Our next book in the summer art program was Iggy Peck, Architect by Andrea Beaty and David Roberts. Iggy Peck is a very creative and independent little boy who has a passion for building things with whatever materials he can find: food, dirty diapers (that got a lot of giggles from the children!), dirt, etc. However, when he gets to the second grade, his teacher tells him that he cannot build anymore! The class goes on a field trip and Iggy's building skills save the day!

The projects that we worked on this week, all had to do with architecture.

The 2-5 year olds made paper bag houses. They started out with lunch sized paper bags and filled them with newspaper. The top was folded over and stapled. They covered the top with a folded piece of paper to make it look like a roof. The bag was then glued onto a recycled piece of cardboard, to create a base. From here, the children had a wonderful time cutting, gluing, adding texture (I brought in some texture plates and let them add texture to construction paper) and going crazy creating their houses. We had beach houses, mansions, crooked houses, etc.


The 6 and 7 year olds traveled to Egypt and made sugar cube pyramids. They heard the word sugar cube and got very excited! They started out by gluing a 6 x 6 grid of cubes onto a paper plate. Then added a 5 x 5 grid on top of that, then 4 x 4, continuing to decrease until they got to a single cube at the very top. I found that tacky glue worked better on this than regular school glue. It was a lot sturdier and held the cubes in place better.

When they were finished gluing the cubes, one of our high school volunteers took the children outside and we use spray stain (I will never go back to brush on stain again!!!) and they sprayed them light brown, making them look like they were built in the desert. Then they got to add fun details: palm trees, camels, people, etc. using any left over craft materials that we had from the previous weeks.

The 8 year olds did a lesson that I found on the  Deep Space Sparkle blog. I bought her "Architecture Made Easy" lesson guide for $5. It's a downloadable PDF file, so you just save it right to your computer and then open it any time you need a lesson. Affordable and easy! Architecture Made Easy- Deep Space Sparkle.The lesson that the children did was the castles. I started out by having a few rectangle templates ready for them to trace onto their drawing paper (usually, I don't go in for templates for my older students, but since this was a 1 time, hour class, I went ahead and did it to allow the children more time to finish the castles). Once they had the rectangles traced for the front of the castle, the turrets, etc, then they began adding details: bricks, windows, drawbridge, flags and banners, etc. They traced the entire drawing with a permanent black marker and then used crayons and colored pencils to color them in.


Pin It

Friday, July 29, 2011

Tall Tales in Art- Weaving a Rainbow


Our next book for our summer program was Weaving a Rainbow by Georgia Ella Lyon. This book goes through the process of how a woman raises sheep, shears them, cards and spins the wool, dyes the yarn, and weaves it at a loom.


For our projects, the 2-5 year olds wove a variety of materials onto a pre-made cardboard loom. We had made the looms out of recycled cardboard: cereal boxes, frozen pizza boxes, cracker boxes, etc. Slits were cut in the top and bottom, about1 inch apart and yarn was wound around the cardboard. This was done before the class so that they were ready for weaving when the children and their caregivers got there.

Then we had a huge supply of materials ready to weave: yarn, ribbon, Mardi Gras beads, colored wire, felt strips, etc and they wove "over, under, over, under" to complete a very colorful, textured piece of art. And of course, for this age group, nothing would be complete without gluing something on, so we got out the glue and many of them glued silk flowers to finish them off.


The 6 and 7 year olds took a piece of paper and folded it 2 times, creating 4 squares. They colored each square a different color with watercolor markers. I had plastic leaf prints that I had bought from Sax that they used to print onto each square, using silver printing ink.

We got out the blow dryers to dry the ink and then cut our loom. Once the loom was cut, the children wove sticks throughout it.


The 8 and up group did a Pollock-ish project. They turned their papers over first and drew lines on the back so that they would know where to cut their strips for weaving. Then they were taken outside to splatter paint 2 pieces of paper with tempera paint. We mainly used fluorescent colored paint for this. Once they had 2 pieces painted, they came back into the museum and they used blow dryers to dry their papers.
When their papers were dry, they cut the papers apart and started weaving them back together. They used masking tape to hold them together.

These turned out amazing!! They were very proud of their paintings!
Pin It

Thursday, July 28, 2011

Tall Tales in Art- Velma Gratch and the Way Cool Butterfly

 For the third week of our summer program, I read the children the book velma gratch & the way cool butterfly by Alan Madison.
Velma is a first grader, with two older sisters. Everyone at her school remembers her sisters, but no one ever remembers Velma. She tries different ways to get herself noticed by her teachers. She finally finds something that her sisters never learned about- BUTTERFLIES! Her class takes a trip to the butterfly conservatory. Velma has a monarch butterfly land on her finger and it won't leave! No one will ever forget this!
If you have never read this book, I highly recommend it! We tied in a little science before we got started on our art projects and what child (and adult) doesn't
love butterflies? There is great vocabulary in the book and the children loved the way Velma went about learning the new words.

The 2-5 year olds then did a painting project with their caregivers. They folded a piece of paper in half and cut out 1/2 of a butterfly.

They opened the paper and painted on only one side.

We made sure to put out fluorescent colors for this
 project.

This project worked out well for the little ones. Aside from being a little messy, they just had to cover the paper with paint.

When they finished, they re-folded their paper and rubbed it really well to transfer the paint to the other half of the page.

When they opened them up, it was priceless to see little eyes get huge! It was like magic had taken place on their paper!
I had a few blow dryers handy for the volunteers to help the kids dry their paint (usually I would put them on a drying rack, but this program is only and hour and a half, no time for allowing paint to dry!).

Once the paint was fairly dry, they glued the butterfly shape onto a piece of construction paper and then started adding details: legs, eyes, antenna, etc.

I had pipe cleaners, construction paper, scissors, glue all handy for them to use.
 The results were absolutely gorgeous! The fluorescent colors really added to the overall effect of the project.

 The 6 and 7 year olds made butterfly molas.

They started out by cutting a butterfly shape (the same way the younger group did) and gluing it onto a piece of construction paper.

Then I had pre-cut pieces of construction paper into 3" x 4" pieces and the student were shown how to cut circle, triangle, ovals, etc.

They learned how to cut multiples of one shape by folding their paper or placing 2 or 3 pieces together.

 As they cut their pieces, they used school glue to glue the pieces onto their butterfly.


The 8 and up group made mosaics. They also cut out a butterfly shape and glued it onto another piece of paper.
I had bought bags of mosaic paper and the students used these to glue onto their buttefly. They used scissors to cut the pieces if they were too big or if they needed triangles.


Pin It

Wednesday, July 27, 2011

Summer Art Program- Willow

For the second week of our summer art program, I read the book Willow by Denise Brennan-Nelson, Rosemarie Nelson and Cyd Moore to the children. This book is a great book for talking about creativity!

All of the students in art class are taught to draw everything exactly alike. However,  Willow, paints what she sees when she closes her eyes. The unimaginative art teacher does not like Willow's way of looking at things. At Christmas the only gift Miss Hawthorn receives is from Willow. Willow gives her art teacher her beloved sketchbook, which begins a change in the unhappy teacher. When the children come back to school in January, they discover an art room and an art teacher who have gone through an extreme transformation!

The projects for this book focused on imagination and creativity! The 2-5 year old group created name creatures. The caregivers helped them fold their paper in half and write their names with a soft-leaded pencil. Then rubbed them so that they could transfer their name onto the other half of the paper, creating a mirror image of their name.

One they had this, the kids took over creating their creatures. They used markers, colored pencils, crayons to color them in.

Since the little ones love to glue, I put out a variety of feathers, sequins, precut paper and glue bottles and let them go for it- decorating their creatures the way they wanted.

The 6 and 7 year olds did personal silhouettes. They had a choice of whether they actually wanted to trace their own silhouette or use a precut doll shape (it was pretty much 50/50 on this). They cut them out and glued them onto colored construction paper.

Then they used a variety of materials to glue onto the silhouettes to describe themselves.

They could also use markers, crayons and pencils to draw things that told about themselves.

This was probably my favorite project all summer!!! Shoe sculptures! A friend of mine called everyone in her neighborhood and they cleaned out their closets for this project- Thank you!!!!

The 8 and up group took a shoe and reimagined it, creating a unique sculpture.

For this, I had cardboard cut for them to use as a base. I had felt, tissue paper, scrapbooking paper, silk flowers (from the dollar store), Mardi Gras beads, Popsicle sticks, etc.


Pretty much anything you can think of would work. I walked around the dollar store and filled up a basket with random things.

I had lots of Tacky Glue, but I also had some glue guns handy, too. We had high school volunteers and caregivers that were available to help with the glue guns.
I found all 3 of these lessons on Artsonia. The shoe sculptures were geared towards middle or high school, but my 8 and up group did really well with it and came up with some great ideas!!! The lobster was my favorite. This little boy had just gone to Galveston for the weekend. He had been crabbing and began his sculpture as a crab. As he progressed, he noticed that it was too long, so it morphed into a lobster. Life experiences! Pin It