Thursday, March 15, 2012

Kindergarten Eric Carle Insects

 Eric Carle is one of my all time favorite children's authors. When I was in the classroom, I used his books all the time.

I have tried a variety of different art lessons using his books as inspiration, but have never been happy with the results- until this year.

I started this project off by showing my students how Eric Carle paints his tissue paper. This slide show was basic enough for my kindergarten students to understand the concept of what they were about to do.
I place 1 tray of tempera paint on each table (8 in all) and on each tray 2-3 textured rollers. I demonstrated how to carefully walk with my tissue paper from table to table (I even demonstrated what would happen to my paper if I ran, ripping a piece, so that they would see the end result).

We reviewed how Eric Carle had used 4 colors on his paper on the website, so they had to stick with 4 colors on theirs (this was a guideline I set out so that I didn't have to go around refilling all of my paint trays every 5 minutes. There were a few students who used all of the colors and got beautiful results
and no one was the wiser!)

I demonstrated how to put the roller into the paint and roll 1 time and then place it onto the tissue paper. Then they were able to move on to another color.

When they had finished filling their tissue paper with color, they brought them to me at the drying rack and went and washed up.

This was actually less crazy and chaotic and than I had originally thought it would be! They were so involved in what they were creating, that they didn't even think about what they could have been doing!

I then took all of the painted tissue paper and cut them into 4 pieces and divided them up between my 6 kindergarten classes.
 The next week, I had a copy of The Very Hungry Caterpillar, which came with an audio CD of Eric Carle reading the story- they LOVED it!!! We then brainstormed all of the different insects that we could think of, as I drew them on the board.

For this part, let me clarify- I am NOT a big pattern person. I believe in letting students use their own creativity to create an end product. However, for this project, I really wanted them to create a large image.

I create tag board shaped for each table: 2 different circles, 2 different ovals, 2 different teardrops.

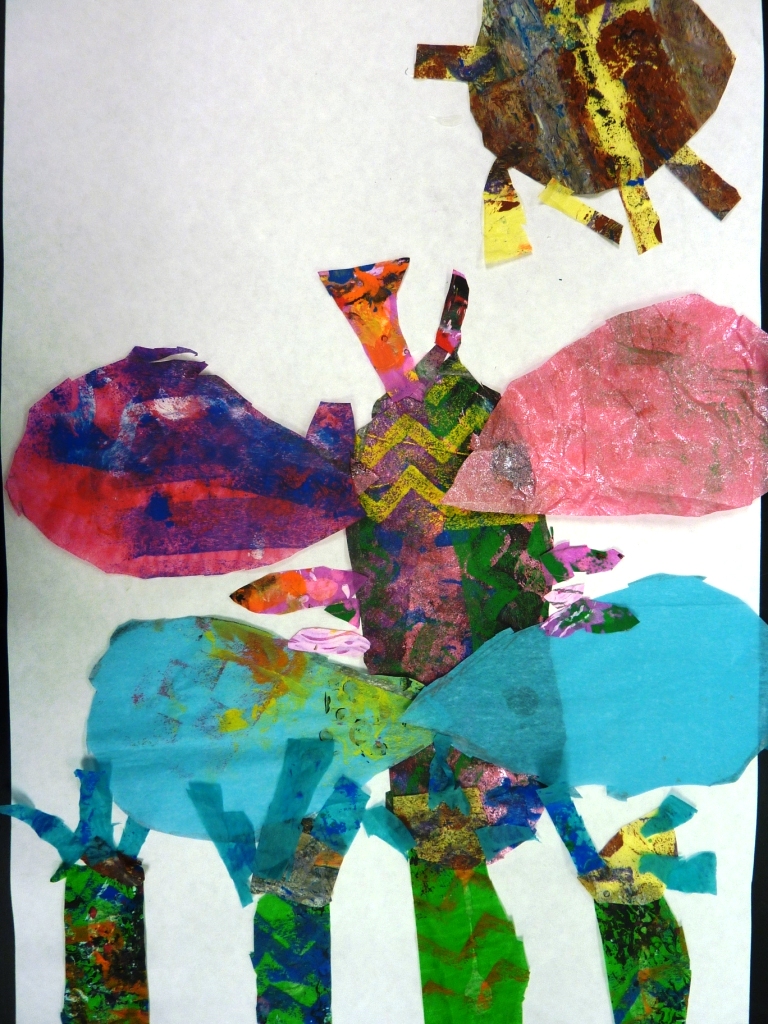
I showed them how to use these shapes to trace onto the tissue paper, cut them out and then glue them onto a piece of white paper to create an insect composition.

Even using the patterns, their pictures turned out so different!

I will definitely be keeping this lesson for next year!!
Pin It

Second Grade Amate Bark Painting


To continue our study of Latin America, second grade began a project based on the Amate Bark Paintings of Mexico. I started the project by showing them this video I found on YouTube.


Then I gave each student a piece of Kraft paper and had them crumple it up and smooth it out 10 times. I had them repeat this 10 times, because the longer they crumpled their paper, the softer and more pliable it became.

They painted the Kraft paper with watered down brown tempera paint, giving it a quick coating- I didn't want the entire paper covered in brown paint, but wanted to give it the look of the bark paper.

The students then began planning out their compositions. I had them draw an animal that could be found in the jungle. They had to practice drawing it bigger than their hand (very difficult for some!) and they had to embellish some aspect of their animal (make it fancy!). They gave their birds curly feathers, long toes on their lizards, crazy manes on their lions, etc. Once they had their animal, they had to have at least 5 pieces of foliage in their jungle. Each piece had to be touching their animal and the side of the paper.

Once they had their picture ready in their sketchbook, they were ready to draw onto their Kraft paper. I had them draw with pencil first and then trace over the drawing with a black marker.

I gave each table a tray of fluorescent tempera paint (no green yet). They were allowed to paint their animal any color they chose- the wilder the better!

When the animals were finished, I gave them a couple of different greens and some white. I showed them how they could mix the colors together to get different tints of green and explained that I didn't want any of their plants to be the same green as any other. They all had to be different.

Once the entire project was dry, they used the smallest brushes I had available and embellished their pictures. Some just added a little bit of white, others added patterns.
The last step was to go over the black marker one more time and retrace it.


Pin It

Spring Art Show

Every year, our school district has a Spring Show at a local mall. This is a great way to showcase our students in a local setting, where our students will get to see their artwork on display in a public forum.

I took some quick photos of the show and put them into Animoto videos. There is one for high school/middle school and one for elementary.

Middle/high school- 


Elementary-

Pin It

Monday, February 20, 2012

Kindergarten Jackson Pollock Paintings


I introduced my kindergarteners to Jackson Pollock by showing them this student-made video that I found on YouTube. They were intrigued by the fact that he painted with his canvas on the floor and that he got his paint all over everything.

I bought ketchup and mustard squeeze bottles at the dollar store and filled each bottle with a different color of tempera paint. I added a little bit of sand to each bottle and mixed it up.

I took the students into the courtyard right outside of my art room and showed them how they were going to lay their paper on the floor and squirt paint onto their paper. Then I demonstrated how to pick up their paper with 2 hands, so that they didn't get themselves completely covered in paint (not sure that mom would appreciate us completely embodying the Pollock style). They then would move on to another color and squirt that onto their paper, repeating the entire process until they had every color on their paper.

The interesting thing, was how long some of the paintings took to dry! I hadn't thought of this and there were a couple of classes that really loaded their papers with paint and their papers took 3 days to fully dry!

For the next class, they added even more textures to their paintings. I gave each table a variety of ribbons, foam shapes and confetti and showed them how to glue it onto their paintings, trying to spread everything around the entire page.


Pin It

First Grade Grecian Urns

 For this project, I got to use my new extruder again. I am hooked!!!

First grade made Grecian urns using red clay- which they thought was awesome! They had only ever used Longhorn White, so this was a completely new experience for them.

They made the basic pinch pot and we worked to build our walls up, so that our pots would be taller.

I gave them 3 coils. One was used to create a base for the urn to sit on. The other two were used to
create handles.

I fired the urns and then they used black glaze to paint patterns. Next year, I think I might just use black tempera. Many of the students had a hard time getting the black on heavy enough for it to really contrast with the red clay.

Then I gave each table a bowl of transparent glaze and showed them how to paint the entire piece until it was completely covered. They freaked out at first, because my transparent is blue. We then had the discussion about glue- when you put it on your
paper, it is white, but when it dries, it is clear. This was going to happen to their blue glaze. It would be clear when I took it out of the kiln.

This appeased them and when they saw them in the glass display case the next week- smiles all around!


Pin It