Thursday, April 7, 2011

Kindergarten Warm/Cool Elmer the Elephant

This is a new project that I did this year with my kindergarteners. I read Elmer by David McKee.
If you haven't read this book, it's a great book to read to your students to talk about being different. After we read the book, I showed them how to use basic shapes to draw their own Elmer. It was like we were doing a magic trick- the ooh's and aah's made my day! Their Elmer's turned out adorable. Then I showed them how to use a tool that the big kids use- a ruler! They used the ruler to draw straight lines on Elmer going side to side and up and down. I made sure to show them how to hold the ruler so that it wouldn't slide on them.


After they had drawn Elmer, we worked on adding some details to our picture to create a landscape: we added the ground, so that Elmer wasn't flying in the air, a tree to show that he was in the jungle, some clouds, the sun, birds, etc.

They traced their entire picture with a black marker.

They used crayons to color the entire background. We really had to talk about how the sky touches the ground. It doesn't stop up at the top of the paper.

When they were finished coloring their background, we learned about warm and cool colors. They got to choose whether they wanted Elmer to be warm or cool, but they could not use both (very difficult for a 5 year old!). They got to use oil pastels to color him in and they had to work really hard to color Elmer in so that it was dark- I kept telling them to press HARD! Pin It

Fifth Grade Giacometti Sculptures

Materials Needed

         • Plastercraft cut into small strips


• Water containers
• Aluminum foil (heavy)
• Masking tape
• Acryllic Paint
• Mod Podge

• Giacometti prints


We did this project as a continuation of the Schapiro project. The students had to create a sculpture of the figure that they had created out of paper.

We looked at different artwork by Alberto Giacometti and talked about how they were all similar. Then we created an armature for our figure out of aluminum foil. We used a piece of foil about 15-18" long and made 3 cuts.

They scrunched the foil to form the human figure. It was important that they do this slowly and carefully or their foil would rip. Once they had the general form for their figure, they could then scrunch it tighter to make it skinnier. They posed the figure into the action that they had used on their 2D project and then they were ready to cover it with Plastercraft strips. I had them cover the entire sculpture 1 time and then use Plastercraft to attach their figure to a cardboard base (corrugated cardboard works the best).

When the Plastercraft was dry, they used papier mache glue and glued tissue paper squares to their figure. I told them to use as many different colors as they could. This was easier for some than others. Many of them really wanted them to look real!

They covered the tissue paper with Mod Podge (you could probably skip the papier mache glue and go right to the Mod Podge to attach the tissue paper) and let this dry.

The final step was using metallic acryllic paint to add all of the fun details that they had added to their 2D project. Again, I told them to go CRAZY- they aren't used to me saying this, so they had fun with it.

Vocabulary:
Armature, balance, form, Plastercraft Pin It

Fifth Grade Schapiro's Shapes

Materials Needed

• sketchbooks
• watercolor paper
• watercolors/brushes
• fadeless construction paper/neon paper
• glue
• scissors
"High Stepping Strutter"- Miriam Schapiro
"Free Falling"- Schapiro

"Anna and David"- Schapiro

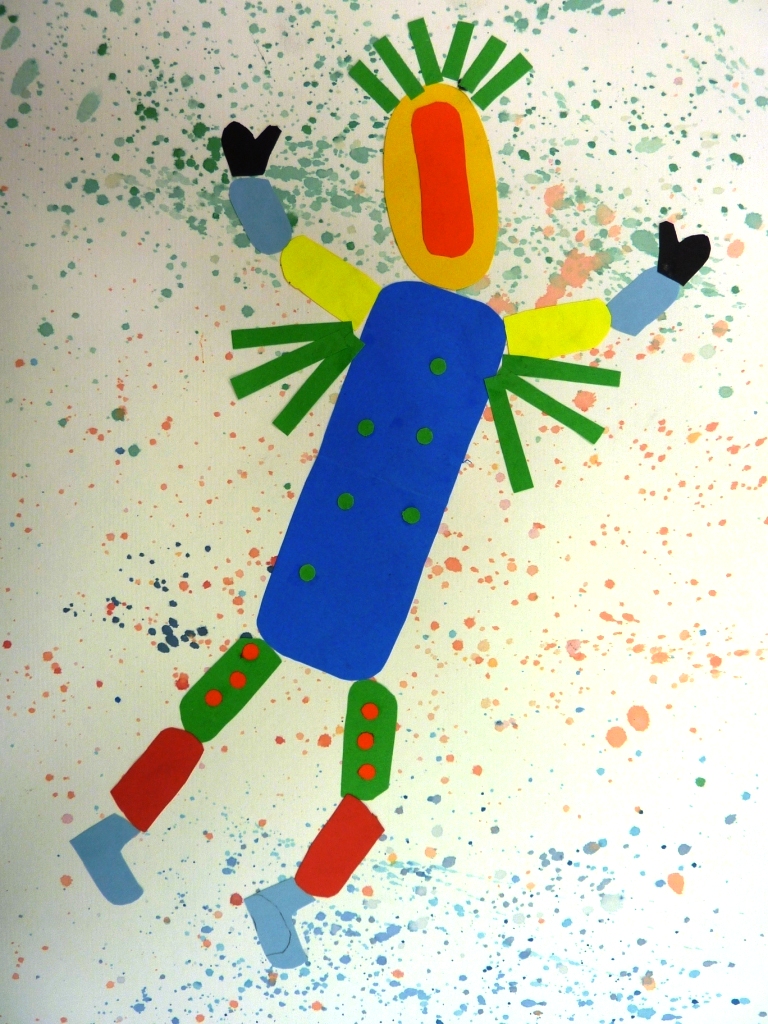
We started the project by looking at a variety of artworks by Miriam Schapiro, focusing on her pieces that used the human figure. We took notice of the use of space and how the figure takes up the entire space. We talked about different actions that we could demonstrate with our figures: running, cheerleading, basketball, ballet, etc. and what positions the different parts of the body would be in.
The students used the wooden manikins that I have in my room to draw 2 figures, each showing a different motion. They had to think about the proportion of the different body parts and what position they should be in. Would the leg be perfectly straight or slightly bent?

When they finished these, we looked at the artwork of Jackson Pollock and talked about how he created some of his more well-known pieces. Then they did a quick splatter paint background using liquid watercolors (my new favorite! I have given up using the pan watercolors- we go through them too quickly and the colors are not nearly as vibrant). I showed them how to control the splatter by tapping their paint brush onto their other hand. By doing this, we had a minimum of clean up. I let them use as many colors as they wanted and the backgrounds turned out to be works of art in themselves.


I had the students make an origami envelope for the next part. They used this to hold all of the pieces that they cut. I asked them to cut out all of their pieces and put their person together first without doing any gluing. That way they could make sure that they had the right proportions, colors, placement, etc. They stored their pieces inside of their envelope for the next class.

When they had all of their pieces ready, they began gluing everything down onto their splatter paper. They used all of the scrap pieces (we didn't throw anything away!) to cut out decorations. I had hole punches on hand for them to use, they cut zig zags, etc. I basically told them to go CRAZY with the decorations.

They ended up looking amazing and we used these to move into a 3D project where the students made a plastercraft sculpture of their figure.

Vocabulary:


space, proportion, movement Pin It

It's Been Awhile!

It's been a long time since I posted any projects! This year has flown by! I'm going to try and get a few  things posted today and get myself caught up. Pin It