Showing posts with label tempera cakes. Show all posts

Tuesday, September 17, 2013

Kinder Art Eyes

I have done this before with kindergarten, but this year, the students were offered choices in their projects.

We started out by talking about our eyes and what we use them for. Then we talked about how an artist uses their eyes: looking at shapes, colors, lines, etc.

The project was for each child to make their own Artist Eyes. Stations were set up for the children and they chose which station they wanted to go to.

***Disclaimer- I am starting the year with a student teacher (a wonderful young lady who was actually with me for the Spring semester last year in an observing capacity- she was actually teaching most of the classes by the end of the year), she has been a great help getting little kinder students into stations, making sure they stay in their station and clean up when they are done. By the time she is finished with her student teaching and leaves me, the students will have a good understanding of the procedures.

The first station was decorating a set of art glasses. In the past, I had students cut these out themselves before decorating. This year, we gave them pre-cut glasses and gave them the entire time to decorate. They were given a box with a variety of materials (sequins, foam shapes, crayons, etc). They used regular school glue to attach their materials.


The second station was a painting station. They students used tempera cakes to paint a large eye on their paper, using a wide range of colors. They learned how to keep the colors pure, clean their brushes, wipe them on the edge of their water container and clean their materials when they were finished.


The third station was a sculpture station. The students were given a set of egg cartons (cut into sets of 2) and a variety of materials (pipe cleaners, sequins, foam shapes, permanent markers). They used craft glue to attach their materials to make a set of googly eyes.

All of these went on display for Open House when we were finished.

The follow up activity to this was using our own Artist Eyes to look for things in art prints. Tables were given an art print and a list of shapes and colors (the list was laminated). They had a dry erase marker and a sock. Their task was to count the number of squares in the art print and write the number on the shape on the list. They went through the entire list, counting and writing numbers (excellent math practice for beginning of the year kinders) and then got to erase the numbers when they had filled their list.


Pin It

Thursday, January 3, 2013

Kindergarten Bluebonnets

These are the bluebonnets we did in years past- Kindergarten Bluebonnets

The project we did this year is the same as in the past. The surprising thing this year, was how well the students did on their sewing! Either I am getting better at teaching it or they are more coordinated!


Here are the bluebonnets we completed this year:


Pin It

Friday, January 20, 2012

Fifth Grade Pagodas


This is an idea I got from the teacher resource Thinking With a Line. I have used the printing ideas previously, but only with PreKinder, Kinder and 1st. I decided to try an activity on architecture with my fifth graders. Since fifth grade is learning about Asia, we focused on pagodas.


We looked at different examples, the lines that were used in them and I had them plan out their building in their sketchbook.

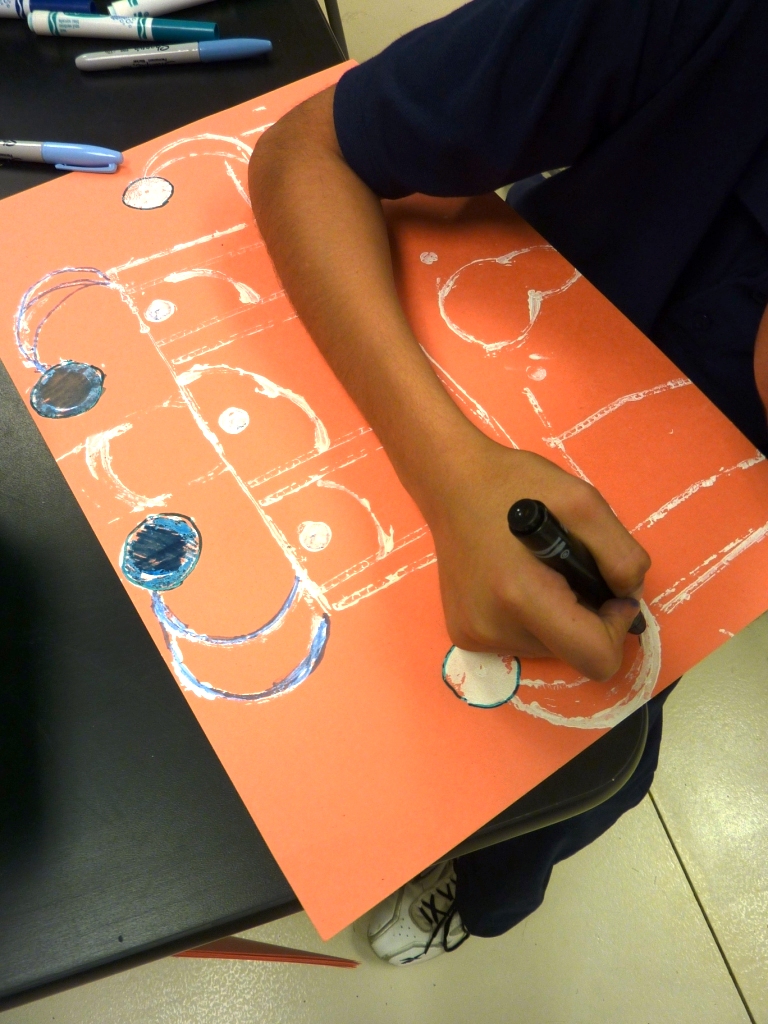
Then I gave each table a basket of printing tools: corrugated cardboard, 1/2 circles (tape rolls that I cut in 1/2), blocks, marker caps, bottle caps, pretty much anything that I thought might make an interesting print.


Each student picked a piece of construction paper and began building their pagoda using white acrylic paint- this was a change for them, since they are used to using black as their outline for everything.

The next week, we discussed color schemes. We reviewed old ones (warm, cool, primary, secondary, complementary, monochromatic) and I threw in a new one (analogous). They had to choose 1 color scheme for their entire pagoda. I gave them a basket with a variety of materials: tempera cakes, watercolors, Sharpies, watercolor markers, color stix, oil pastels. They could use as many as they wanted, as long as they stuck with their scheme.

I was very impressed with the results!


Pin It

Tuesday, June 14, 2011

Kindergarten Manana Iguana

I originally found this project at Deep Space Sparkle- one of the art blogs that I follow. This blog has so many amazing art projects for elementary students, sometimes it's hard to narrow it down to just one! I really like the projects that she does for her primary grades. Check it out at: http://www.deepspacesparkle.com/2009/09/tortuga-time/


I used the Deep Space Sparkle project as a jumping off point and added to it. I read the book to the students first. They loved it! If you haven't read it, it's based on the book, The Little Red Hen, but instead, uses animals that you would find in the desert (living in Texas, some days, it FEELS like we live in a desert!): turtle, snake, rabbit and iguana. To make it even better for my bilingual students, the book has many sections in simple, rhyming Spanish.

We started the project off with a demonstration on how to draw a turtle, a snake, a rabbit, or an iguana. Unfortunately, I only have pictures of the turtles and snakes (my flash drive got wiped out soon after and I was only able to save about 1/2 of the pictures from this project).

For the turtle, we drew the 2 eyes first- nice big ovals. Then we drew the head around the eyes. For the shell we made a 1/2 circle and connected it at the bottom with a straight line. I reminded the students that we always draw our subject bigger than our hand (if we put our hand on top of it and you can't see it, then it is too small). We added 4 legs and a small tale.

For our snake, we started with the eyes, again- big ovals. Then I had them draw a long, wavy line from 1 side of the paper to the other and then back to the other side to connect it.

No matter which animal they chose to draw, they had to add a pattern to it (shapes, lines, etc).

They traced their animal with black marker and then colored them with warm colored oil pastels.

The next week, I gave them a piece of blue construction paper. We talked what a desert is and what you would find there: cactus, sun, sand, etc.

I put trays of tempera cakes on each table and they painted their background. If I were to do this again, I think I would change this part up. The construction paper did not hold up well to the tempera cakes. I would use a better quality paper for the background.

Then they cut out their animals (we did a quick review of how to hold their scissors, turn the paper, not scissors, etc) and then used glue dots to attach their animals to the background.
Pin It

Friday, June 10, 2011

Kindergarten Bluebonnets

 This was the project that I used for our annual Houston Livestock and Rodeo Art Show this year. I originally found the activity in the December 2009 issue of Arts and Activities.

Before class, I had some of my older students help me thread plastic tapestry needles with green yarn. They tied a knot in the end and used masking tape to tape the yarn so that when the kindergartners were sewing, the yarn would not come unthreaded.

Each kindergarten student had a 12 x 18 piece of burlap. I ordered the variety pack, so that each student could choose different colors.

I had them draw a vertical line with a crayon in the middle of the burlap. This was for the stem of their bluebonnet.


I demonstrated how to sew the stem, going front to back and then
passed out the needles.

For some of the students, the sewing was pretty easy. However, for many of my students, this was a difficult task. We spent the majority of class sewing the stem of our flower.

I had some pre-cut pieces of green felt out so that when students were finished sewing, they could glue their leaves onto their bluebonnets.

I gave them a green marker and they added small stems/branches radiating out from the central stem.
 During the last class, I had a tray on each table with a blue tempera cake on it. I showed the students how to dip their thumb into a tub of water and then rub it in the paint. They then made 3 prints and repeated the process.

Once they had finished the blue, I went around and switched out the blue tempera cakes and gave each table white tempera cakes.

They repeated the same process, however this time they used their index finger and made a print right over the top of the blue thumbprints.
Pin It

Wednesday, June 8, 2011

PreKinder Shape Printing

When I do printing with my PreKinder students, my favorite resource to use is the book Thinking With a Line by Cathy Topal. The book has some fantastic printing ideas for early childhood, which can easily be adapted for older students as well.

Before I am ready to start this project, I start collecting. I collect: tape rolls, plastic caps (milk, soda bottles, water bottles, etc), corrugated cardboard (I cut this into pieces that are small enough for the students to hold them in their hands), and any other objects that would make an interesting line or shape when printed.

I divide everything up and make a separate basket of "tools" for each table. I put a tray of tempera paint on each table (only 1 color) and then I demonstrate how to dip the tools into the color using an up and down motion. I then show them how to do the same up/down on their paper to create a nice crisp print.

The first week, I let them free explore and print anything they wanted.

The next week, I showed them how they could use the tools to create shapes.

The third week, we used tempera cakes (my personal preference for the younger students) and painted the shapes.
Pin It

Thursday, November 4, 2010

Kindergarten Art Eyes

Materials

· watercolor paper
· tempera cakes
· paintbrushes
· water cups
mirrors

The main purpose of doing this activity was to get the students adjusted to using their entire paper and teaching them the proper painting procedures. The end product turned out so much better than I could have anticipated!!!!

I tried to give the students colors that did not correlate with their true eye colors, leading them to be creative in their paintings.

I had them look in a mirror and find the shapes- ovals, circles, etc.
We talked about how their brush needed to take a bath after each color so that the other colors would not get dirty and then I let them go for it!

Gorgeous!! Pin It

Thursday, July 1, 2010

Prekindergarten Handpainting

For this activity, my prekinder students began learning about primary and secondary colors.

To begin the project we read the book Mouse Paint by Ellen Stoll Walsh. We talked about the 3 colors of paint that the mice jumped into (primary) and the 3 colors that they made when they danced in the paint (secondary).

Each student had a piece of watercolor paper and traced their hand at least 5 times (more if they could fit it). We talked about not letting the pencil touch their fingers so that they didn't get skinny fingers.

When it was time to paint, I had 1/2 of my tables set up with primary color tempera cakes and the other 1/2 set up with secondary tempera cakes. They chose a table to sit at and used the colors on that table to paint ONLY their hands.

For the next class, I put the tempera cakes out again, but this time I helped them look at the colors that they had already used. If they had already used red, blue and yellow, then they had to sit at a table with orange, green and violet and vice versa. For this part, they were painting the background of their paper. Pin It