Showing posts with label watercolor. Show all posts

Friday, January 20, 2012

Fifth Grade Pagodas


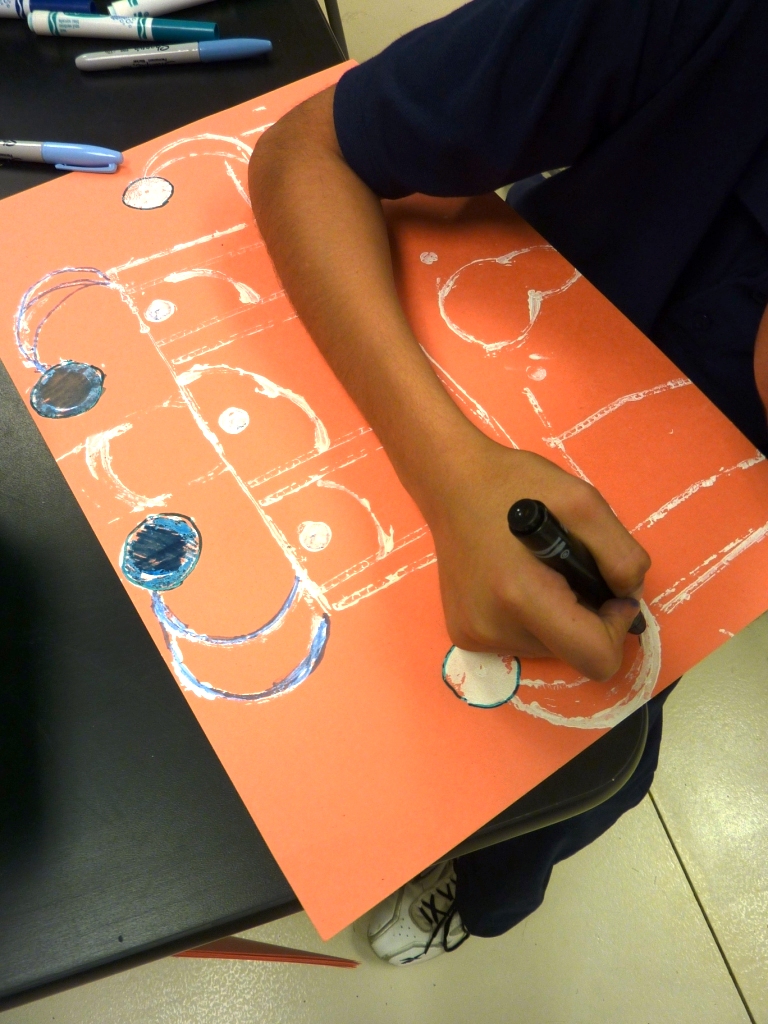
This is an idea I got from the teacher resource Thinking With a Line. I have used the printing ideas previously, but only with PreKinder, Kinder and 1st. I decided to try an activity on architecture with my fifth graders. Since fifth grade is learning about Asia, we focused on pagodas.


We looked at different examples, the lines that were used in them and I had them plan out their building in their sketchbook.

Then I gave each table a basket of printing tools: corrugated cardboard, 1/2 circles (tape rolls that I cut in 1/2), blocks, marker caps, bottle caps, pretty much anything that I thought might make an interesting print.


Each student picked a piece of construction paper and began building their pagoda using white acrylic paint- this was a change for them, since they are used to using black as their outline for everything.

The next week, we discussed color schemes. We reviewed old ones (warm, cool, primary, secondary, complementary, monochromatic) and I threw in a new one (analogous). They had to choose 1 color scheme for their entire pagoda. I gave them a basket with a variety of materials: tempera cakes, watercolors, Sharpies, watercolor markers, color stix, oil pastels. They could use as many as they wanted, as long as they stuck with their scheme.

I was very impressed with the results!


Pin It

Saturday, October 15, 2011

Fifth Grade Russian Nesting Dolls

My 5th graders are traveling to Asia for their art room projects this year. Our first stop was Russian Nesting Dolls or Matryoshka dolls.

I had them draw out at least 3 dolls in descending order that related to each other in some way.


They started out with the large doll and made 2 pinch pots. Some of them added ears, noses, etc, but the majority had the basic pinch pot. Then they made the middle pot and the baby pot.


Once they were fired, I decided not to use glaze on them and we used extra-fine point Sharpies to draw out our details onto the clay.


They used watercolors to paint them. I have a few that I am thinking of using in shows later this year and I might have those students varnish them to give them a more finished look. Pin It

Friday, September 9, 2011

Fifth Grade Sketchbooks

Every year, my 2nd through 5th graders make their own sketchbooks. We make these out of basic manila and construction paper, stapled together. The students use these to do quick drawings of what they want their final product to look like. At the end of the year, the students get to take them home and they have a sketchbook to draw in over the summer. Last year, I gave the students a challenge: keep your sketchbook and draw in it throughout the summer vacation. Bring it back in the fall and I will automatically give you extra credit. I actually had quite a few students who took this challenge to heart and brought their sketchbooks to me during the first 2 weeks of school.
This year, I decided to splurge on the 5th grade sketchbooks. I bought a journal making kit from Sax (Item #404154).


The students used metallic watercolor paint and painted 2 pieces of paper (I gave them a choice of white or black- next year, I might give them more options) and they filled the pages with color.


When the pages were filled with color, they ripped the papers into pieces the size of a quarter.


They applied the pieces to the chipboard covers using tempera varnish, creating a collage effect.


 When both boards were completely dry, they assembled their sketchbook with 2 chipboards, 30 pages and 1 spiral binder. I let them use metallic markers to decorate the covers. Throughout the year, they will be able to use these to plan out their projects, draw, create a scrapbook, etc. At the end of the year, they will have a genuine sketchbook to take home.

They are so excited about these- especially since they are the only grade level that got to make them! I debated about spending the money on it, but watching the excitement and pride makes it all worthwhile!
Pin It

Friday, June 24, 2011

Second Grade Rousseau's Jungle

 This project was a pretty simple one, but the end effects were very nice.

I started the project by reading the book, Who Is the Beast? by Keith Baker. The illustrations in the book were great for showing the students overlapping- which was what I wanted to focus on in this project.

Before I started reading, I gave the students 3 things to look for in the book:
1)   animals
2)   colors used in the plants
3)   shapes used in the plants and animals

After I finished reading, we brainstormed a list of animals that could be found in the jungle. The students then chose 2 animals and practiced drawing them in their sketchbooks (I have a milk
 crate filled with old calendar pictures that I have collected. I pulled all of the jungle animals and the students used these as their reference materials).

When they had finished their sketches, they chose the 1 animal that they liked the most and drew this on a piece of watercolor paper. The rules for this were:
1) touch at least 2 sides of the paper (to make sure that it was large enough)

2) use a whisper pencil (draw lightly, so that you can erase)


 After they drew their animal, I then showed them how to draw the vegetation. We talked about how Rousseau hid his animals in the plants, so we would have to draw our plants from the side of the paper towards the center, so that they would cover part of our animal. Anything that was covering our animal, we would then erase (thus the reason for using a whisper pencil).

Rules for this step:
1)   plants had to touch the animal

2)   had to have plants coming from the top, bottom and both sides of the page

I also told them that they didn't have to draw just leaves. I showed them pictures of different flowers that they could use, also.
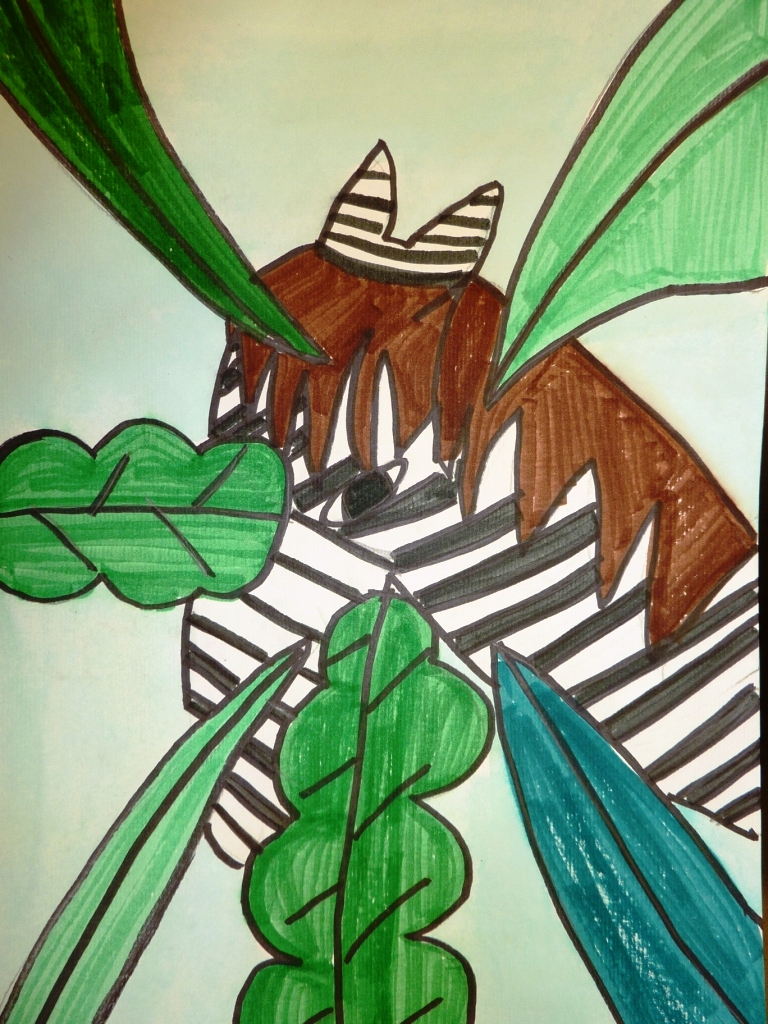
 When they had finished their drawing, they used black marker to trace the entire picture and then colored in their animal and plants. I had bought every kind of Crayola marker imaginable (Bold, Tropical, Standard) so that they would have a variety of colors to choose from. They were asked to try and use each green only 1 time, so that they would have variety in their jungle.
 For the background, we used liquid watercolor to create a wash. I gave each child a cup with watered down blue watercolors and they painted in any areas that had not been colored with markers.

I love the contrast between the markers and the watercolor!
This last piece (the zebra) was voted as Artist of the Week on Artsonia (http://www.artsonia.com/). She won a $50 gift certificate to Dick Blick and a plaque with her name and a picture of her artwork on it!

She was thrilled. I sat with her and helped her order her art supplies- it was like Christmas morning when the box arrived! Markers, sketchbooks, oil pastels, glitter! Every child's dream! Pin It

Wednesday, August 11, 2010

Fourth Grade Texas Wildflowers

Materials Needed

• 9 x 12 poster board
• pencils
• black glue
• watercolors/brushes
• newspaper
Other resources
The Legend of the Bluebonnet- Tomie de Paola
The Legend of the Indian Paintbrush- Tomie de Paola

Getting to Know series- Cezanne
Cezanne prints
Texas wildflower prints

My fourth graders read the books The Legend of the Bluebonnet and The Legend of the Indian Paintbrush, both by Tomie dePaola. When we finished, we looked at pictures of different Texas wildflowers. Using these pictures, they created their own still-life of Texas wildflowers. They started their still-life with a pencil drawing on a piece of white paper.

When they finished, they turned the paper over to the back and they colored on the back of the drawing with their pencil. It was really important to make sure the entire paper was covered in graphite.


They placed this on top of a piece of poster board, with the graphite touching the poster board. They used their pencil to trace over their original drawing, creating a graphite transfer onto the poster board.

Using black glue (I make this with school glue and black acrylic), they traced their lines. When the glue was dry, they used watercolors to paint their flowers. They used many different techniques to paint. They used wet-on-wet and dry brush. They used different values of the same color and made some of their own colors.

These turned out so stunning, that I used many of them for various shows throughout the year. Pin It

Wednesday, August 4, 2010

Fourth Grade Color "Wheels"

Materials Needed
• pencils/erasers
• masking tape
• watercolors/brushes
• water containers
individual color wheels

Fourth grade went more in depth into the color wheel than they have in previous years. They learned a mnemonic device (memory) for remembering the order of the colors in the color spectrum and rainbows- ROY G. BIV (red, orange, yellow, green, blue, indigo, violet). They used this to paint a new version of a color wheel. They taped two pencils together with an eraser between them. With this device, they drew ribbons on their paper. Then they used watercolors to paint the ribbons. They began with red (the first color in the rainbow- R) and continued through the spectrum.
Pin It

Tuesday, July 20, 2010

Second Grade Barn Dance

Materials Needed

• watercolor paper
• 1/2 sheet watercolor paper- scarecrow
• oil pastels
• watercolors
• brushes
• black permanent markers
• kosher salt
• self-adhesive foam buttons
• pencils/erasers
• straw/raffia- 1" pieces
Barn Dance- Bill Martin, Jr

Getting to Know series- Moses, Rockwell Norman Rockwell prints
Grandma Moses prints


I began the project by reading the book Barn Dance by Bill Martin, Jr to my second graders. As I was reading, I asked the students to focus on the following things: the scarecrow, the objects they saw on the farm. When I finished reading, we brainstormed a list of things that could be found on a farm. We also talked about what the scarecrow looked like- what was he wearing, what is his job, etc.

I gave the students a 1/2 piece of watercolor paper and asked them to draw a scarecrow. I demonstrated how they could use basic shapes (squares, rectangles, circles, triangles, etc) to draw the body, clothes, patches of their scarecrow. They traced their scarecrow with black marker and then painted him/her using watercolor markers.


When it was time to work on the background paper, we had a discussion about foreground and background. We looked at different landscape prints and pointed out the size of objects that were in the foreground and in the background. We also took note of how the horizon line is rarely is straight line.

I had them draw their background in pencil, adding any details that they wanted to have on their farm- reminding them to keep in mind size. They traced everything with a black marker.

They used oil pastels to color their barn, animals, trees, and at the end added white stars in the sky. They did not color their ground or sky with pastels.

Once the oil pastels were finished, we got out the watercolors again. They used the watercolors to paint their ground (most used green, however, a few used brown) and the sky. We were looking for a night sky, so most used black (we rarely get to use black watercolor, so this was pretty exciting!). I showed them how to dilute the color so that it was not pitch black.

When the background is dry, the students cut out their scarecrows and stuck them on using self-adhesive foam "O" to give it a 3-dimensional feel. I had pieces of raffia ready and they added these onto their scarecrow for a little more detail. Pin It

Monday, July 19, 2010

First Grade Line Monsters

Materials Needed

• Watercolor paper
• Crayons
• Watercolor markers
• Spray bottles
• Thick black markers
• Scissors
• Black paper
• Construction paper crayons
• Line poster

I did this one around Halloween time. We read the book There's A Monster in My Closet by Mercer Mayer. We looked at all of the monsters in the book. We focused on eyes, teeth, fingers, etc. Then I had each student draw their very own monster. We talked about how it needed to be larger than their hand (we didn't want any mini-monsters). They could draw as many arms, legs, eyes, etc as they wanted. It was their own creation. They traced their monster with a black marker.

We reviewed 2 concepts next: warm/cool colors and lines. They had to choose whether they wanted their monster to be warm or cool and then they filled their monster with a variety of lines: zig zag, wavy, spiral, dotted, etc using the colors that they had chosen (with crayons).

I demonstrated how to paint their monster using a wet-on-wet wash, continuing with the same colors that they were already using.

They cut their monsters out (we reviewed how to hold our scissors) and glued them onto a piece of black construction paper with glue dots ("just a dot, not a lot").

We finished the project by tracing around the monsters with construction paper crayons (they show up really well on the black paper) in the opposite color scheme than they had previously used. Pin It

Saturday, July 3, 2010

Kindergarten Monet Water Lilies

Materials:
• Watercolor paper
• Oil pastels- take out black and brown
• Watercolor paints
• Lg watercolor brushes
• Water containers
• Green construction paper
• Coffee filters
• Watercolor markers
“Water Lilies”-Claude Monet

“Waterlilies and Japanese Bridge”- Monet


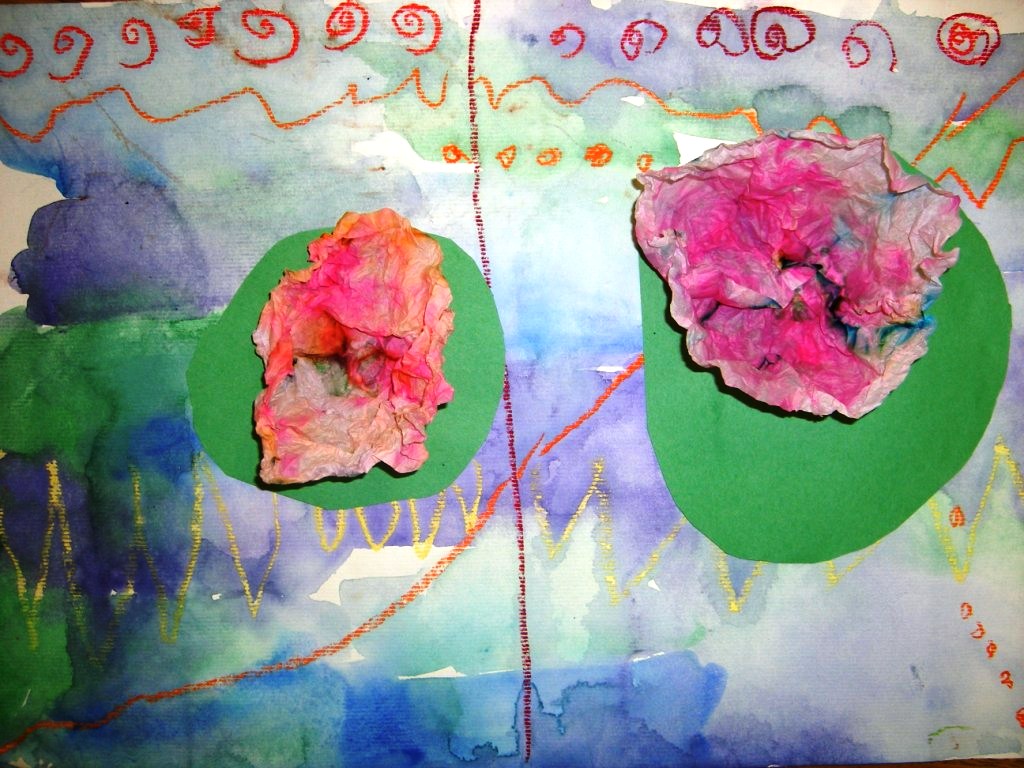
I started this project by reviewing warm and cool colors and lines (straight, zig zag, dotted, etc). Then I had the students choose whether they wanted to use warm or cool colors to draw the lines on their watercolor paper.

Each table had a basket of oil pastels on it (I purposely took out the the black, brown, pink, etc). They had to use their color scheme to fill their paper with lines.

Then I showed the students how we were going to make our lilies. I used watercolor markers on coffee filters and again, drew lines on them. Each student had 3 coffee filters that they drew lines on. When they were finished, they brought their filters to me and I dipped them into a bucket of water and they got to squeeze the water out of them and put them onto paper towels to dry.

For the 2nd class, we did a wet-on-wet watercolor wash on their background. I showed them how to use a spray bottle to spray their paper from side to side, top to bottom (I counted 6 sprays and put the bottle down). Then we dipped our brushes into water and got our cool color watercolors wet. We washed the paper with cool colors, making to sure to give our brush a bath when we wanted to change colors.

For the last class, I gave each student 1 piece of green construction paper and showed them how to cut 3 big ovals out of it. I passed out their coffee filters, which they opened up. There were lots of ooh and aahs when they saw how the colors had bled. They used glue dots to trace around the green ovals and placed these onto their background papers. Then they placed 3 glue dots in the middle of the lily pad and placed their flower on it. I had them hold it down and count to 20 to make sure it stuck to the paper.

When they were finished, we compared our art to the art of Monet. They were very excited that they looked so similar! Pin It

Thursday, July 1, 2010

PreKindergarten Torn Paper Bluebonnets

In Houston, a big part of our fall semester is spent preparing for our annual Houston Livestock and Rodeo Exhibit. I have each grade level work on a project for this big event.

My prekindergarten students made Torn Paper Bluebonnets this year. It was the first year we did this project and they turned out beautiful!

We started the project by doing a wet-on-wet watercolor background. The students used spray bottles to spray a piece of watercolor paper with water. Then we used liquid watercolors and dropped color onto the paper using an eye dropper. For this particular project, we were learning about warm and cool colors, so we used warm colors on the background.

The students loved watching the colors bleed into each other!

We repeated the same process on a smaller piece of paper for the flowers. However, this time, we only used blue (cool colors).

By this point, the first session was over and we left the papers out to dry.

For the 2nd session, the students worked on tearing the blue papers into little pieces. I showed them the size we wanted (about the size of a quarter) and they set to work. By the end of the class, we had a flurry of blue flower petals all of over the room!

For the 3rd session, I had patterns for the vase ready to go. The students traced the pattern onto a piece of wallpaper (adding texture to their picture) and cut it out. They glued these at the bottom of their paper and added 3-5 strips of green constructions paper for the stems.

Then they started gluing flower petals onto the stems to finish off their Texas Bluebonnets.

I only meet with my Prekinder classes for 15-20 minutes, so I needed to break the project up into very short increments. It took us 3 classes to get them finished. Pin It