Showing posts with label pattern. Show all posts

Thursday, October 18, 2012

Kinder Jasper Johns

This was a project that I did last year with my kindergarten students. I changed it up a little bit this year.

Here are the results from last year:
Kindergarten Jasper Johns


We started out the same way, by coloring our paper using either a warm or cool color scheme. This year, I did cut the paper in half (I found that the large paper for my kinders at the beginning of the year was quite daunting!).

This year, I stayed with the numbers and letters, however I used our school's die cut machine and cut out what the students would need for the project.

I placed each one into a basket and had numbers on one side of the room (in 8 different baskets) and letters on the other side of the room (in 8 different baskets). I had the baskets color coded so that the students would know the difference between the numbers and letters.

I demonstrated how I wanted them to get 1 piece at a time and use 4 small drops of glue ("just a dot, not a lot!") on their number/letter and place it on their paper. Then they could get up and walk (again, demonstrating the correct and incorrect way to do this- the sillier I was in the demonstration, the better they understood it) to get another piece.

For the finishing touch, they used a black marker and added patterns to each square. Since they are working on patterns in their classrooms, they had fun with this! Pin It

Monday, June 25, 2012

Fifth Grade Mandalas

Last year's mandalas: Mandalas 2011

This year:

Pin It

Monday, February 20, 2012

First Grade Grecian Urns

 For this project, I got to use my new extruder again. I am hooked!!!

First grade made Grecian urns using red clay- which they thought was awesome! They had only ever used Longhorn White, so this was a completely new experience for them.

They made the basic pinch pot and we worked to build our walls up, so that our pots would be taller.

I gave them 3 coils. One was used to create a base for the urn to sit on. The other two were used to
create handles.

I fired the urns and then they used black glaze to paint patterns. Next year, I think I might just use black tempera. Many of the students had a hard time getting the black on heavy enough for it to really contrast with the red clay.

Then I gave each table a bowl of transparent glaze and showed them how to paint the entire piece until it was completely covered. They freaked out at first, because my transparent is blue. We then had the discussion about glue- when you put it on your
paper, it is white, but when it dries, it is clear. This was going to happen to their blue glaze. It would be clear when I took it out of the kiln.

This appeased them and when they saw them in the glass display case the next week- smiles all around!


Pin It

Second Grade Oaxacan Animals

Second grade just completed their clay project. They learned about Oaxacan Wood Carvings and how they are made. My rule for their animal was that it had to have either legs or fins (I wanted to stay away from having a bunch of students make snakes).They drew their practice
 sketches in their sketchbook and then
they were ready to learn how to make their animal. I found this very simple YouTube video on making four legged animals. After watching the video, I passed out their clay and tools and they got started. I walked around helping them build their animal. The main issue I found, was not using the knife to cut deep enough into the clay for the legs. I had to help quite a few students with this part. I also had to show them how the legs should be about as big as their finger, otherwise they wouldn't be able to stand up. I still got a few animals with matchstick legs, but overall, I think they did pretty well.


 Once the animals were fired, I made the decision to paint them with tempera paint. I wanted them to have the vibrant colors of the Oaxacan animals, and I was afraid that we wouldn't be able to get that with the glazes that I had available.

I had each student choose the color that they wanted to paint their animal. They painted the entire animal and then we left them to dry.

The next week, I pulled out the neon tempera and my smallest paintbrushes. I gave each table a plate with every neon color on it and showed them how
paint patterns.

Their first instinct was to paint the entire animal again. I had to remind them to leave the original color showing- they were only painting PATTERNS!

The last step was covering each animal with a coat of tempera varnish.


Pin It

Fourth Grade Ndebele Dolls

I found this project on Artsonia. It is a project that Linda Welling at Cedar Creek Elementary posted. Funny thing is, I found this PowerPoint to show to my students and it is also from Linda Welling! I added in the YouTube video on the last slide.
I also found this great book, Ndebele: The Art of An African Tribe by Margaret Courtney-Clark. The book has some great pictures of the Ndebele people, their art and the dolls.

Fourth grade continued their tour of Africa by working on an Ndbele doll. They learned about the bead work and artistry of the Ndebele people. I showed them a doll that I had purchased and then they began their own designs in their sketchbooks.

They had a lot of fun with this one. It's been awhile since we have done a simple drawing project. We have been doing a lot of printmaking, collage and sculpture projects, so this was a return to basics for us.

The children decided what they wanted their doll to look like. My only requirement was that, like the Ndebele, they needed to have
at least 3 patterns somewhere on the doll.

Once the design was ready, they drew it on a large piece of drawing paper and traced it with black marker.

Now the fun part!!! They got to use Crayola Color Switcher markers. The majority of my students do not have art materials at home. The only time they get the chance to create is when they are in my room, so when they used the Color Switchers.... you would have thought I hung the moon!

Even better, they liked them so much, that they took better care of them than any other materials we have used thus far!!


Pin It

Monday, August 8, 2011

Back to school Ideas

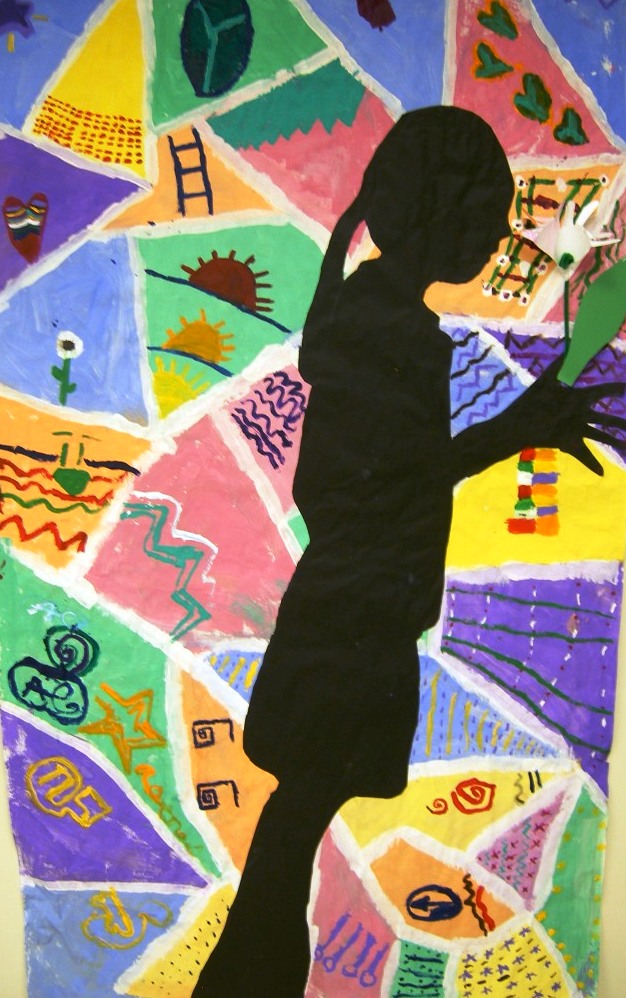
A fellow art teacher in my district (smART Class) recently asked for back to school ideas.  Thanks, Natalie, for the suggestion! I had forgotten all about this project!! Here is a project that I did a couple of years ago. Each grade level had their own contribution towards these life-size sihouettes.

PK-Kinder: were traced onto black butcher paper for the black silhouettes (I had 2 parent volunteers who did all of the tracing for me). They also traced their hands and made the flowers that the silhouettes are holding

1st and 2nd grade: painted the colored backgrounds onto white butcher paper and glued the silhouettes onto the colored backgrounds

3rd grade: painted the white outlines and cut out all of the silhouettes

4th and 5th grade: painted all of the intricate patterns onto the colored background and helped hang all of the pieces.


Pin It

Monday, July 25, 2011

Fifth Grade Ceramic Picasso's

This was the fifth graders last project of the year.

We studied about Picasso and looked at his variety of portraits, focusing on how he combined profiles with the front view to make a single portrait.

I had the students draw the portrait that they wanted to create first. I really stressed that there was no right and no wrong way to do this. I suggested that they try to combine a frontal portrait with a profile, but that they did not have to.


The two rule that I did have for them were:
1) must have pattern or texture (or both)
2) must be 3 dimensional (they had to use clay to build the face up somehow

I then gave them a pre-cut slab of clay. I rarely use my slab roller anymore. I bought a large cheese slicer and I use that to cut all of my slabs. It is so much easier and less time consuming than using a slab roller!

The students used their clay tools to cut out the shape that they wanted for their face. They used the extra clay that they had from cutting out the shape
of the face and built the eyes, mouth, hair, etc. I had dollar store garlic presses that they used if they wanted to add hair.

We found that the hair looked really cool, but once it was fired, the hair had a tendency to break off- I need to find a better way to do this. If there are any suggestions out there, I would love to hear them!

I had a wide variety of texture plates out for them to use, if they wanted. Some went crazy with texture, others did not.

When they were ready to go, I fired them and then they were ready to glaze.
 I showed the students how they could divide their face into different sections and glaze each section a different color- they loved this, because it meant that they could use more colors!!

Unfortunately, since this was our last project of the year, I was unable to put these on display throughout the school. The rest of my faculty did not get a chance to see these amazing ceramic pieces. That will teach me to leave my clay project until the end of the year! Poor planning on my part!
Pin It

Saturday, July 23, 2011

Fourth Grade Kente Cloth

 I have done variations of this project for many years. This year, we took a trip to Africa and learned about Kente cloths. We looked at a variety of different cloths and the patterns that were used in them.

I gave each student a 9 x 12 sheet of styrofoam and we divided the sheet into a 4 x 3 grid with our rulers. My directions for this were that each section needed to have a different pattern in it.

They spent the first day working on their patterns (drawing them in the styrofoam with their pencils).

The second day, we reviewed complementary colors. Each student chose the 2 that they wanted to use. They had to create 2 prints of their design (1 in each of their colors) and we set those up to dry.
 On the 3rd day, we worked on making our loom. They chose 1 of their prints for their loom and we folded it in half (like a taco, with the opening at the top). I had them use a ruler and draw a line across the top of the paper to use as their stop sign when they were cutting:


They cut their loom, stopping at their "stop sign".
Then we get the second piece and cut that into strips. I have them number the strips so that they know what order they go in. They weave these into their loom and then glue the edges so that they don't fall out.
When they have finished weaving, they glue the entire piece onto a piece of kraft paper.
For the finishing touch, they use a hole punch, punch a row of holes on both ends and then use yarn to add a fringe.
Pin It