Friday, October 19, 2012

Display Easels

This is an idea that I found originally on Pinterest.

I made these easels out of corrugated cardboard by cutting a 2 basic L shapes with my exacto knife. I taped them together with my fun duct tape.

To make them more fun, I have set it up an activity for the students to work on when they are finished with their work. They get an easel and decorate it using whatever materials they choose. The only stipulation is that they must demonstrate symmetry on the easel so that both sides are exactly the same.

My idea for these easels is that I will be using them at the end of the year for my Fine Arts Museum Night. I have around 800 pieces of art to display and I was short on space last year. I am hoping that the easels will help alleviate some of this.
Pin It

Thursday, October 18, 2012

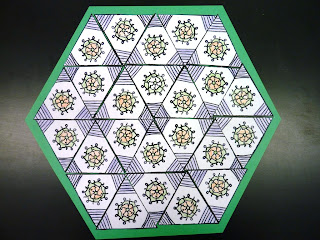
Fifth Grade Mandalas

I have done this mandala lesson for a couple of years, but have adapted it this year to allow the students some choice in their final product.

Here are some examples from previous years:

Fifth Grade Mandalas

I start out by showing the students this PowerPoint I found:


The students then had to plan their project in their sketchbooks. I had them decide on which project they wanted to do:

folded paper (to create 8 sections)
folded paper with a CD in the middle
print
hexagon

They had to decide if they were going to use geometric or organic shapes for their design and then which color scheme they wanted to use: primary, secondary, complementary or monochromatic.

While they were working on their plans, I began meeting with each group and helped them get started with the initial steps in their projects- folding paper, using compasses, dividing up their Styrofoam for their prints, etc.

As the project progressed, I met with the different groups to discuss their next step. How they needed to add color- using markers, Color Sticks, crayons, ink, etc.; how to build their hexagon, etc.

The students seemed to really enjoy that their projects had the chance of being completely different than everyone else in the class. I am really hoping that as we go along, they will start to think outside of the box and present ideas to me as to what they would like to do.


Pin It

First Grade Picasso

First grade did this project last year, however, this year, I have adapted it. Our district is really working towards varied outcomes this year, so I am trying to give the students more choices in their projects. This is easier on some projects than others.

Here is how I did it for this particular project:

Last year, everyone did a watercolor Picasso project:
First Grade Picasso

This year, everyone drew a Picasso portrait. They all chose their color scheme (warm or cool) and then I gave them 3 choice for how they could add color:

liquid watercolor
Crayola Color Sticks
oil pastels

They followed their color scheme to color their entire project. Here are some of the results:


Pin It

Kinder Jasper Johns

This was a project that I did last year with my kindergarten students. I changed it up a little bit this year.

Here are the results from last year:
Kindergarten Jasper Johns


We started out the same way, by coloring our paper using either a warm or cool color scheme. This year, I did cut the paper in half (I found that the large paper for my kinders at the beginning of the year was quite daunting!).

This year, I stayed with the numbers and letters, however I used our school's die cut machine and cut out what the students would need for the project.

I placed each one into a basket and had numbers on one side of the room (in 8 different baskets) and letters on the other side of the room (in 8 different baskets). I had the baskets color coded so that the students would know the difference between the numbers and letters.

I demonstrated how I wanted them to get 1 piece at a time and use 4 small drops of glue ("just a dot, not a lot!") on their number/letter and place it on their paper. Then they could get up and walk (again, demonstrating the correct and incorrect way to do this- the sillier I was in the demonstration, the better they understood it) to get another piece.

For the finishing touch, they used a black marker and added patterns to each square. Since they are working on patterns in their classrooms, they had fun with this! Pin It