Tuesday, July 16, 2013

First Grade Starry Night Cityscapes

 This became my favorite project that the first graders did this year! This was a 2 part project. We started by reading the book City Lullaby by Marilyn Singer. As we read, we talked about the different sights and sounds in the city.

Then we made our cityscape by printing with white acrylic paint and recycled tools (corrugated cardboard, tape rolls, toilet paper rolls, blocks, etc).

The students needed to start their city at one side of their paper and continue over to the other. We talked about how the buildings could be different heights and how they should have windows, doors, etc.

The next week, they created the background with a black piece of construction paper and oil pastels. Each table had a selection
oil pastels that had been rubber-banded together (2 or 3 colors together), and they made their swirls starting from one side of their paper all they way to the other side.

They cut out their cityscape and glued it onto their background.

To give it a little bit of sparkle, I let them glue sequins onto the sky for their stars.


Pin It

Kindergarten Tar Beach

 This is the first year that I have done a project using "Tar Beach" with my students. I did this one with my kindergartners. We looked at the art print and the students told me everything they could find- and boy, did they find a lot!

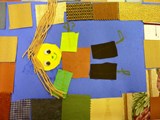
After discussing the print, I gave each of them a piece of blue paper and we started working on the border. For this, we used a combination of fabric
squares (I found an entire box at a resale shop for $5!) and wallpaper squares. We used regular school glue for this and this was my first mistake. Next year, I believe that I will adapt this and use craft glue. We lost a lot of squares because they wouldn't stick.

For the center of the project, they made a self-portrait of themselves flying in through the sky. I wanted to make sure they made them large enough. One
thing that I am always struggling with with my little ones is getting their images LARGE! So I put a basket of shape tracers (square, rectangle and circle) on each table (I am not a fan of tracers, but this is one way for me to make sure that their image is large enough).

They used these to trace shapes onto scrap paper. We talked about using symmetry- if they made 1 arm blue, the other one should be blue,also. They cut
the shapes out and glued them onto their sky to create their self-portrait.

I had a basket of yarn with different brown colors in it. I had pre-wound them into small enough balls that they could handle them without them unwinding all over the room. They chose the color they wanted and cut hair to glue onto their head. Many of them would show me their pictures with 1 piece of yarn. We then had to have the discussion about how much hair we have on our head-
"Do you only have 1 hair on your head or do you have lots of hair?"

I gave them 2 googly eyes (oh, how they love googly eyes!) and then they used marker and crayons to decorate and add details.

After doing this project once, I want to adapt this for the next time. I want to have the children add a skyline in the background and instead of using blue
paper, I believe we might actually paint our sky.


Pin It

Kindergarten Romero Britto

 A new project that I did with my kindergarteners this year was based on the art of the artist Romero Britto.

I started by putting together a basic Power Point about Britto. The children loved his artwork. They loved the big bold lines and the bright colors.

 Once we had looked at a variety of images, the we brainstormed ideas for some images that we could draw on our paper. I told them that whatever they drew, it had to be large and that I wanted it to be simplified.

There were lots of hearts, flowers and cars....

 I gave each child a piece of paper (9 x 12) and they drew their image in pencil first. I had them trace the image with black marker and then I taught them how to use a ruler- they LOVED this! They felt like the big kids using this tool! They used the ruler to draw lines through their image to divide the image and then used the marker to trace these lines.

They chose their color scheme (warm or cool) and used markers to color each section of the image. We talked about not letting the same colors touch and then they set to work.

When they had finished coloring the central image, we started on the background. We used the ruler again (reminding them of the proper way to
 use it) and they drew at least 5 lines around the outside of their image (most children drew more).

They used the markers to color the background with the opposite color scheme.
 The finishing touch was using metallic markers to decorate different sections with a variety of lines (straight, zig zag, wavy, etc). Some students decorated only a few spaces and some students went to town and decorated every space they could find!

Overall, I was quite pleased with the end result!


Pin It