Showing posts with label animals. Show all posts

Thursday, March 15, 2012

Second Grade Amate Bark Painting


To continue our study of Latin America, second grade began a project based on the Amate Bark Paintings of Mexico. I started the project by showing them this video I found on YouTube.


Then I gave each student a piece of Kraft paper and had them crumple it up and smooth it out 10 times. I had them repeat this 10 times, because the longer they crumpled their paper, the softer and more pliable it became.

They painted the Kraft paper with watered down brown tempera paint, giving it a quick coating- I didn't want the entire paper covered in brown paint, but wanted to give it the look of the bark paper.

The students then began planning out their compositions. I had them draw an animal that could be found in the jungle. They had to practice drawing it bigger than their hand (very difficult for some!) and they had to embellish some aspect of their animal (make it fancy!). They gave their birds curly feathers, long toes on their lizards, crazy manes on their lions, etc. Once they had their animal, they had to have at least 5 pieces of foliage in their jungle. Each piece had to be touching their animal and the side of the paper.

Once they had their picture ready in their sketchbook, they were ready to draw onto their Kraft paper. I had them draw with pencil first and then trace over the drawing with a black marker.

I gave each table a tray of fluorescent tempera paint (no green yet). They were allowed to paint their animal any color they chose- the wilder the better!

When the animals were finished, I gave them a couple of different greens and some white. I showed them how they could mix the colors together to get different tints of green and explained that I didn't want any of their plants to be the same green as any other. They all had to be different.

Once the entire project was dry, they used the smallest brushes I had available and embellished their pictures. Some just added a little bit of white, others added patterns.
The last step was to go over the black marker one more time and retrace it.


Pin It

Monday, February 20, 2012

Second Grade Oaxacan Animals

Second grade just completed their clay project. They learned about Oaxacan Wood Carvings and how they are made. My rule for their animal was that it had to have either legs or fins (I wanted to stay away from having a bunch of students make snakes).They drew their practice
 sketches in their sketchbook and then
they were ready to learn how to make their animal. I found this very simple YouTube video on making four legged animals. After watching the video, I passed out their clay and tools and they got started. I walked around helping them build their animal. The main issue I found, was not using the knife to cut deep enough into the clay for the legs. I had to help quite a few students with this part. I also had to show them how the legs should be about as big as their finger, otherwise they wouldn't be able to stand up. I still got a few animals with matchstick legs, but overall, I think they did pretty well.


 Once the animals were fired, I made the decision to paint them with tempera paint. I wanted them to have the vibrant colors of the Oaxacan animals, and I was afraid that we wouldn't be able to get that with the glazes that I had available.

I had each student choose the color that they wanted to paint their animal. They painted the entire animal and then we left them to dry.

The next week, I pulled out the neon tempera and my smallest paintbrushes. I gave each table a plate with every neon color on it and showed them how
paint patterns.

Their first instinct was to paint the entire animal again. I had to remind them to leave the original color showing- they were only painting PATTERNS!

The last step was covering each animal with a coat of tempera varnish.


Pin It

Friday, June 24, 2011

Second Grade Rousseau's Jungle

 This project was a pretty simple one, but the end effects were very nice.

I started the project by reading the book, Who Is the Beast? by Keith Baker. The illustrations in the book were great for showing the students overlapping- which was what I wanted to focus on in this project.

Before I started reading, I gave the students 3 things to look for in the book:
1)   animals
2)   colors used in the plants
3)   shapes used in the plants and animals

After I finished reading, we brainstormed a list of animals that could be found in the jungle. The students then chose 2 animals and practiced drawing them in their sketchbooks (I have a milk
 crate filled with old calendar pictures that I have collected. I pulled all of the jungle animals and the students used these as their reference materials).

When they had finished their sketches, they chose the 1 animal that they liked the most and drew this on a piece of watercolor paper. The rules for this were:
1) touch at least 2 sides of the paper (to make sure that it was large enough)

2) use a whisper pencil (draw lightly, so that you can erase)


 After they drew their animal, I then showed them how to draw the vegetation. We talked about how Rousseau hid his animals in the plants, so we would have to draw our plants from the side of the paper towards the center, so that they would cover part of our animal. Anything that was covering our animal, we would then erase (thus the reason for using a whisper pencil).

Rules for this step:
1)   plants had to touch the animal

2)   had to have plants coming from the top, bottom and both sides of the page

I also told them that they didn't have to draw just leaves. I showed them pictures of different flowers that they could use, also.
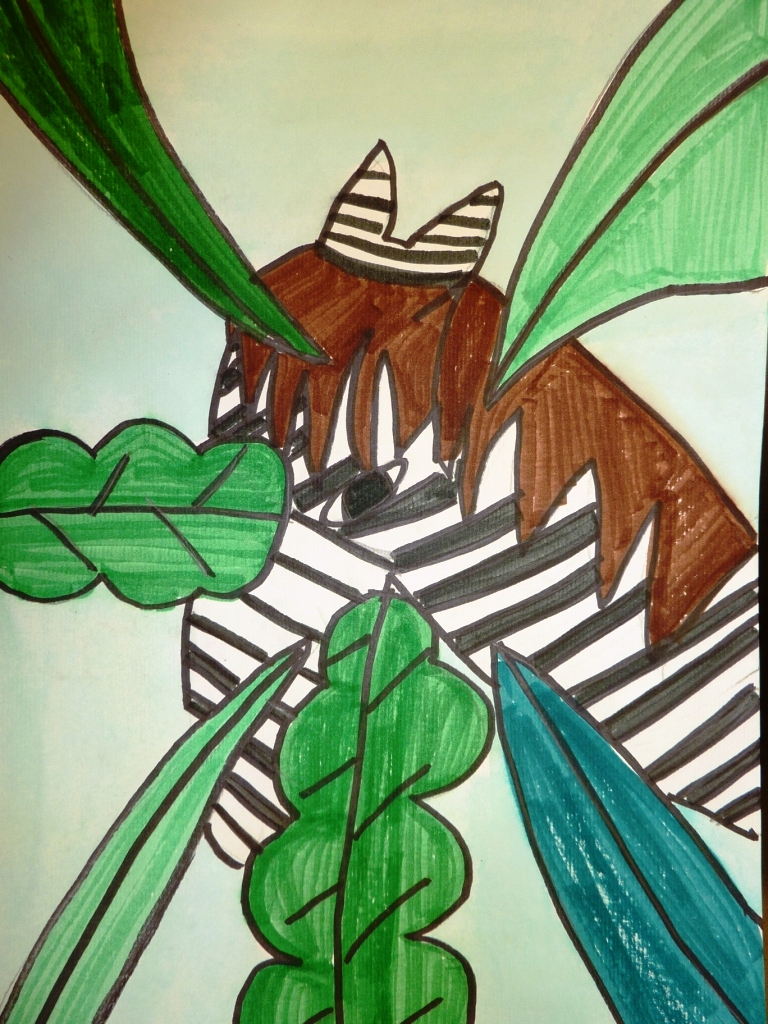
 When they had finished their drawing, they used black marker to trace the entire picture and then colored in their animal and plants. I had bought every kind of Crayola marker imaginable (Bold, Tropical, Standard) so that they would have a variety of colors to choose from. They were asked to try and use each green only 1 time, so that they would have variety in their jungle.
 For the background, we used liquid watercolor to create a wash. I gave each child a cup with watered down blue watercolors and they painted in any areas that had not been colored with markers.

I love the contrast between the markers and the watercolor!
This last piece (the zebra) was voted as Artist of the Week on Artsonia (http://www.artsonia.com/). She won a $50 gift certificate to Dick Blick and a plaque with her name and a picture of her artwork on it!

She was thrilled. I sat with her and helped her order her art supplies- it was like Christmas morning when the box arrived! Markers, sketchbooks, oil pastels, glitter! Every child's dream! Pin It

Monday, July 19, 2010

First Grade Ceramic Frogs

Materials Needed

• cardboard for tables
• clay
• tools
• newspaper
• glaze

My first graders made ceramic frogs for the first time this year. We began the unit by reading the book The Icky, Sticky Frog by Dawn Bentley. The book has great illustrations of the frog and the students loved the long, sticky tongue that they could actually touch.

After we finished reading the book, we did a quick review of clay and it's properties- dries out if we play with it too much, crumbles, etc. Then I passed out a piece of clay to each of them. I demonstrated how to roll it into a ball, while I counted to 5 (this helps them know when to stop). We then made out pinch pot by sticking our thumb into the clay and then using our fingers (crab claws) to pinch around the pot to create the walls. When they had a pot, I showed them how to set the pot on its side to create a big, open mouth for their frog.

I then passed out another piece of clay and had them divide it into 4 pieces. They rolled these into tubes about the size of their finger and I showed them how to attach these to the body of their frog to create their legs.

The last part of construction was rolling a small piece of clay into a smaller tube and attaching it inside the mouth for the tongue and then rolling 2 small spheres for the eyes. These were attached on the top of the mouth.

After the frogs were fired in the kiln, I placed glaze on the tables and the students were able to glaze their frogs. Pin It

Thursday, July 1, 2010

PreKinder Matisse Animals

For this project, we started with the background paper. I gave each table pieces of colored tissue paper. (Make sure that it is NOT the bleedless tissue paper. You want the color to transfer to the background.) Each table had bowls of vinegar and paintbrushes. The students put pieces of tissue paper on their white background paper and brushed the tissue with vinegar. They covered the entire paper with colored pieces of tissue paper. We put these up to dry for the next class.


For the next class, I read the book Brown Bear, Brown Bear to the students.
We talked about the different animals in the book and the shapes that are used
 to draw them. Each student chose 1 animal to make using die-cut construction
paper shapes. I reminded them how to apply glue using dots and they got to work.

When their animal was finished, they used crayons to decorate their animal. Pin It