Showing posts with label sharpie. Show all posts

Saturday, November 24, 2012

Second Grade Aztec Art

The projects from last year: Second Grade Aztec Art

This year's project added a couple of choices for the students:


1.  copper repousse by itself


2.  printmaking


3.  copper repousse and printmaking together

I stressed to the students that those that opted for choice 3 would really have to stay focused, since they would have a lot more to do to complete their project than the other options.

From there, we began our project by creating 2 practice drawings in our sketchbooks, after having read the book, Musicians of the Sun. They were allowed to create a drawing based on one of the characters and stylize it as they saw fit.

We learned about complementary colors and they colored their sketches.

They chose 1 of their drawings and copied it onto a piece of 5 x 5 manila paper, without coloring it.

As they were doing this, I began meeting with small groups to demonstrate the steps for each different project.

Project 1:
They taped their manila paper to a piece of copper and traced the design. I made sure that they knew they had to place their copper/manila paper on top of their sketchbooks in order for the design to come through.

Then they took their manila paper off and used their pencils to color in different parts of the positive space, making these "pop out" of the copper- lots of oohs, aahs and Wows! during this stage.

They used Sharpies in their chosen complementary colors to color their design and it was glued onto a piece of black construction paper.

Project 2:
The manila paper was taped onto a 5 x 5 piece of Styrofoam. The design was traced with their pencil.

Then they took their manila paper off and used their pencils to color in different parts of the positive space (same as the copper project).

They picked up 4 pieces of construction paper (2 of each of their complementary colors) and went to my printing station. They created 4 prints that were exactly the same and set them on the drying rack to dry. The next week, they came in and glued these onto a piece of black paper.

Project 3:
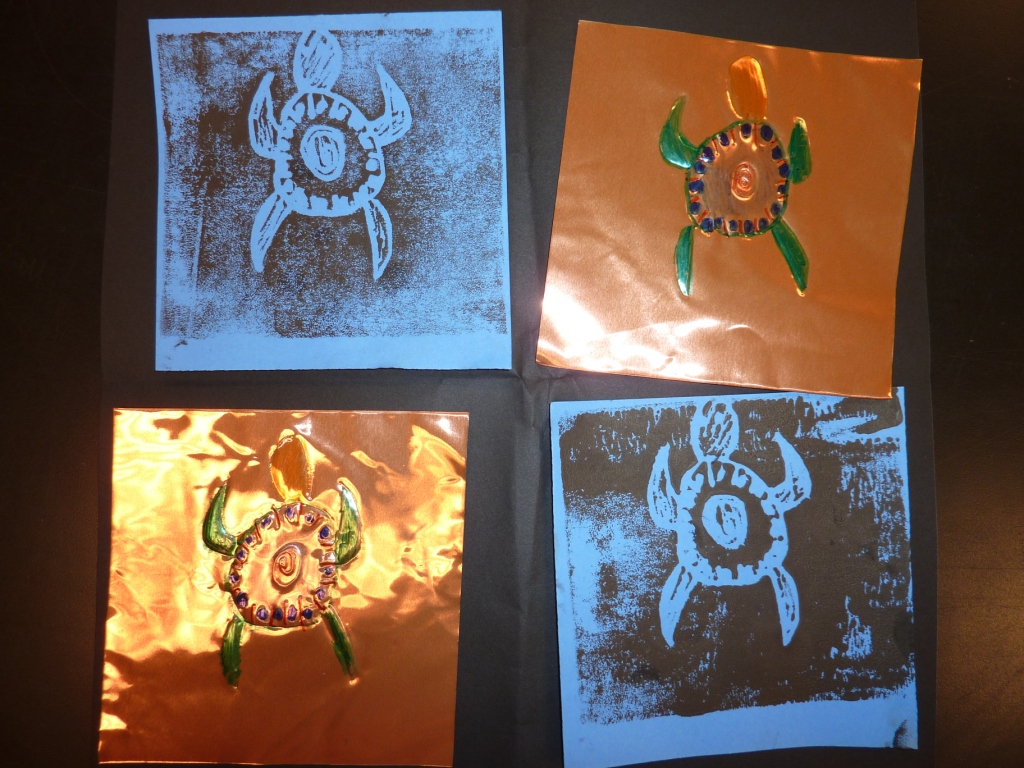
This was a combination of the 2 projects. I had them start with the Styrofoam. However, instead of creating 4 prints, they only created 2. When these were completed, they used the exact same piece of manila paper with their design on it and taped it to a piece of copper. They followed the steps for the copper project, however, they had to create 2 pieces of copper instead of only 1.

All of their pieces were glued onto a piece of black paper.


All in all, giving the second graders these choices worked pretty well- better for some classes than others, but as a whole, well. I think it will work much better the next time, because they will be used to making their own choice, reading directions and problem solving, instead of depending on me to give them all of their answers.

Pin It

Wednesday, June 20, 2012

Third Grade Didgeridoos

The last project that the 3rd graders worked on this year was an Australian didgeridoo.

I started out by reading the book Do You Do a Didgeridoo? to them. It's a very silly, sing song book and they loved it! After that, I showed them a Power Point that I had put together explaining what didgeridoos are, how they are made and at the end, included a YouTube video of an aborigine man playing a real didgeridoo.


After this, we went to the teacher work room and each student got a piece of butcher paper (I let them choose their color). We went back to the room and I had them divide their paper into at least 8 sections. I demonstrated how to fill each section with a Zentangle design using their fine tip black marker (we used quite a few of these- 3rd and 5th grade were both using them and with 200 students using markers, they either dried up or the tips got smashed).


When their designs were completed, I showed them how to take either paper towel rolls or toilet paper rolls (I always haveb large bins outside of my door where students and faculty can drop off any items that they want to recycle, so I had plenty for this project!) and tape them together so that they were long enough for the butcher paper to wrap around.

We used clear packing tape to tape the outside and I have stored these for the summer so that I can put them on display when we go back to school in August.

Unfortunately the pictures are not the best, but hopefully you will get the idea. I think next year, I will give them more than just black markers.....


Pin It

Mehndi Hands

I found this lesson in the April 2011 issue of School Arts magazine. I started the
project out by reading the students the book Nadia's Hands by Karen English and 
Jonathan Weiner. Then we discussed what Mehndi is and compared it to tattoo art, 
which, of course, they are all fascinated by.

I found this wonderful Power Point by Linda Welling that had some great info and really nice photos (I have used a lot of her Power Points in my art room and would like to thank her for the resources and the time and hard work that she has put into them!)


I had them trace their hands onto a piece of watercolor paper at least 2 times.

At this point, I found a couple of YouTube videos that gave good demonstrations of Zentangles.


I had a wide variety of Zentangle resources ready for them to use. They divided each hand into at least 3 sections and then filled each section with a different Zentangle pattern using a fine point Sharpie marker (just an FYI- we went through a LOT of markers- with 120 students, I had to keep a supply on hand).


Once the hands were filled with patterns, they chose their color scheme. I demonstrated how to do a wet-on-wet wash and they filled in the background using liquid watercolors (I have pretty much stopped using the pan watercolors- the liquid lasts so much longer and the colors are beautiful!), letting the colors bleed together.
Pin It