Showing posts with label texture. Show all posts

Thursday, June 20, 2013

Tall Tales and Art- Leaf Man

Today's book was Leaf Man by Lois Ehlert.While reading the book, the children talked about the different shapes that the artist had made using leaves and other natural elements. I had been talking to the parents during the previous sessions, warning them that we were going to be needing a collection of natural elements for today's projects (leaves, flowers, grass, twigs, acorns, etc.). They brought these in to create a nice, large variety of materials for the students to use in all three projects.

Our youngest group then worked on leaf rubbings. I had the leaf pattern rubbing plates that I had bought from Sax (order number 076928). The children did a various rubbings on manila paper and then cut them out. They glued these onto another piece of paper, building animals, people, faces, etc.


The next group used their collected materials to build their own Leaf Man... or butterfly, or flower, or... anything they could imagine. They glued the piece onto paper and added a other scrap materials that we had left over from previous classes.


**Note- Elmers is NOT strong enough for this. Craft glue would have worked much better.


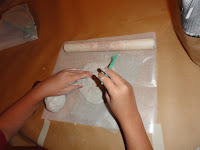
The last group built a leaf man face out of air dry clay. I had them place the clay onto a piece of wax paper. They rolled the clay out and built the face first. They used pieces of clay to create their own leaves, berries, grass, etc. Those that had brought their own natural elements used these to add fun details to their faces.


Pin It

Monday, February 20, 2012

Kindergarten Jackson Pollock Paintings


I introduced my kindergarteners to Jackson Pollock by showing them this student-made video that I found on YouTube. They were intrigued by the fact that he painted with his canvas on the floor and that he got his paint all over everything.

I bought ketchup and mustard squeeze bottles at the dollar store and filled each bottle with a different color of tempera paint. I added a little bit of sand to each bottle and mixed it up.

I took the students into the courtyard right outside of my art room and showed them how they were going to lay their paper on the floor and squirt paint onto their paper. Then I demonstrated how to pick up their paper with 2 hands, so that they didn't get themselves completely covered in paint (not sure that mom would appreciate us completely embodying the Pollock style). They then would move on to another color and squirt that onto their paper, repeating the entire process until they had every color on their paper.

The interesting thing, was how long some of the paintings took to dry! I hadn't thought of this and there were a couple of classes that really loaded their papers with paint and their papers took 3 days to fully dry!

For the next class, they added even more textures to their paintings. I gave each table a variety of ribbons, foam shapes and confetti and showed them how to glue it onto their paintings, trying to spread everything around the entire page.


Pin It

Friday, July 29, 2011

Tall Tales in Art- Weaving a Rainbow


Our next book for our summer program was Weaving a Rainbow by Georgia Ella Lyon. This book goes through the process of how a woman raises sheep, shears them, cards and spins the wool, dyes the yarn, and weaves it at a loom.


For our projects, the 2-5 year olds wove a variety of materials onto a pre-made cardboard loom. We had made the looms out of recycled cardboard: cereal boxes, frozen pizza boxes, cracker boxes, etc. Slits were cut in the top and bottom, about1 inch apart and yarn was wound around the cardboard. This was done before the class so that they were ready for weaving when the children and their caregivers got there.

Then we had a huge supply of materials ready to weave: yarn, ribbon, Mardi Gras beads, colored wire, felt strips, etc and they wove "over, under, over, under" to complete a very colorful, textured piece of art. And of course, for this age group, nothing would be complete without gluing something on, so we got out the glue and many of them glued silk flowers to finish them off.


The 6 and 7 year olds took a piece of paper and folded it 2 times, creating 4 squares. They colored each square a different color with watercolor markers. I had plastic leaf prints that I had bought from Sax that they used to print onto each square, using silver printing ink.

We got out the blow dryers to dry the ink and then cut our loom. Once the loom was cut, the children wove sticks throughout it.


The 8 and up group did a Pollock-ish project. They turned their papers over first and drew lines on the back so that they would know where to cut their strips for weaving. Then they were taken outside to splatter paint 2 pieces of paper with tempera paint. We mainly used fluorescent colored paint for this. Once they had 2 pieces painted, they came back into the museum and they used blow dryers to dry their papers.
When their papers were dry, they cut the papers apart and started weaving them back together. They used masking tape to hold them together.

These turned out amazing!! They were very proud of their paintings!
Pin It

Monday, July 25, 2011

Fifth Grade Ceramic Picasso's

This was the fifth graders last project of the year.

We studied about Picasso and looked at his variety of portraits, focusing on how he combined profiles with the front view to make a single portrait.

I had the students draw the portrait that they wanted to create first. I really stressed that there was no right and no wrong way to do this. I suggested that they try to combine a frontal portrait with a profile, but that they did not have to.


The two rule that I did have for them were:
1) must have pattern or texture (or both)
2) must be 3 dimensional (they had to use clay to build the face up somehow

I then gave them a pre-cut slab of clay. I rarely use my slab roller anymore. I bought a large cheese slicer and I use that to cut all of my slabs. It is so much easier and less time consuming than using a slab roller!

The students used their clay tools to cut out the shape that they wanted for their face. They used the extra clay that they had from cutting out the shape
of the face and built the eyes, mouth, hair, etc. I had dollar store garlic presses that they used if they wanted to add hair.

We found that the hair looked really cool, but once it was fired, the hair had a tendency to break off- I need to find a better way to do this. If there are any suggestions out there, I would love to hear them!

I had a wide variety of texture plates out for them to use, if they wanted. Some went crazy with texture, others did not.

When they were ready to go, I fired them and then they were ready to glaze.
 I showed the students how they could divide their face into different sections and glaze each section a different color- they loved this, because it meant that they could use more colors!!

Unfortunately, since this was our last project of the year, I was unable to put these on display throughout the school. The rest of my faculty did not get a chance to see these amazing ceramic pieces. That will teach me to leave my clay project until the end of the year! Poor planning on my part!
Pin It

Saturday, June 25, 2011

Third Grade Big Mouth Fish

The third graders made big mouthed fantasy fish for their ceramics project. This is, of course, the project that they look forward to all year long....

I started off the project by reading them the book, Fidgety Fish by Ruth Galloway. We ended up having quite a lively discussion about what the word fidgety means and in what instances they become fidgety! It ended up being a very good teachable moment!

From there, the students got out their sketchbooks and they had the rest of class to draw 2 imaginary fish.
The criteria for this project:

1) had to be an imaginary sea creature (but could combine aspects of real ones)
2) had to have 2 textures
3) had to have 2 patterns

When they came in for the next class, I had a tray of clay slabs ready to go (I bought a heavy duty slicer- it looks like a large cheese slicer. I use this to cut all of my clay slabs. I can get them done in just a few minutes and they are all a uniform size. I rarely use my slab roller- it is too awkward for my students to use and I am always worried about their fingers getting caught).
I give each child a slab of clay and show them how to roll it like a taco (lots of giggles at this analogy). They have to smooth the edges together or it will crack when the clay dries.

Then they have to decide which end they want to be the big mouth and which end they want to be the tail.

The tail end gets close up and pinched together. They can then use their clay tools to cut out the shape they want their tail to be.
The mouth gets left open. Most of the students left it as an oval or a circle. I had a few adventurous students who tried making square and heart shaped
mouths.

Then I gave each student a ball of clay. They used this to add fins, eyes, teeth, tongues, etc.  I showed them how to score their pieces before attaching them (we lost a few eyes and teeth that were not attached well).

They used their tools (clay knives, Popsicle sticks, toothpicks, pencils, straws, etc) to add texture to their fish and then brought them to me as they finished up. I added their initials and class code to the bottom and then left them on their class shelf to dry.

After they had been fired, the students were ready to glaze.

I placed 6-8 different colors on each table and we talked about how they needed to cover the entire area that could be seen (they were NOT to glaze the bottom). They were also told to glaze the inside of the mouth. I reminded them 1 last time that I needed to see some sort of pattern on their fish and then they were off!

I fired them 1 last time and these are a few of the finished products. Pin It

Thursday, November 4, 2010

Fifth Grade Reptiles

Materials Needed

· 9 x 24 black paper
· pencils
· erasers
metallic markers


Resources:
Chameleon's Colors Chisato Tashiro
Visuals of chameleons, iguanas and other reptiles

I started this project by reading Chameleon's Colors by Chisato Tashiro to my fifth grade students. Then the students had to draw a reptile that incorporated at least 3 pattterns, 2 visual textures.

In their sketchbook, they practiced drawing a reptile, including a branch for it to sit on. Then we talked about the different patterns that we could use for different sections of the reptile.

When they were ready, they drew their reptile on a piece of black paper and sketched in the different sections.

They added color by using metallic markers. Pin It