Eric Carle is one of my all time favorite children's authors. When I was in the classroom, I used his books all the time.
I have tried a variety of different art lessons using his books as inspiration, but have never been happy with the results- until this year.
I started this project off by showing my students how Eric Carle paints his tissue paper. This slide show was basic enough for my kindergarten students to understand the concept of what they were about to do.
I place 1 tray of tempera paint on each table (8 in all) and on each tray 2-3 textured rollers. I demonstrated how to carefully walk with my tissue paper from table to table (I even demonstrated what would happen to my paper if I ran, ripping a piece, so that they would see the end result).
We reviewed how Eric Carle had used 4 colors on his paper on the website, so they had to stick with 4 colors on theirs (this was a guideline I set out so that I didn't have to go around refilling all of my paint trays every 5 minutes. There were a few students who used all of the colors and got beautiful results
and no one was the wiser!)
I demonstrated how to put the roller into the paint and roll 1 time and then place it onto the tissue paper. Then they were able to move on to another color.
When they had finished filling their tissue paper with color, they brought them to me at the drying rack and went and washed up.
This was actually less crazy and chaotic and than I had originally thought it would be! They were so involved in what they were creating, that they didn't even think about what they could have been doing!
I then took all of the painted tissue paper and cut them into 4 pieces and divided them up between my 6 kindergarten classes.
The next week, I had a copy of The Very Hungry Caterpillar, which came with an audio CD of Eric Carle reading the story- they LOVED it!!! We then brainstormed all of the different insects that we could think of, as I drew them on the board.
For this part, let me clarify- I am NOT a big pattern person. I believe in letting students use their own creativity to create an end product. However, for this project, I really wanted them to create a large image.
I create tag board shaped for each table: 2 different circles, 2 different ovals, 2 different teardrops.
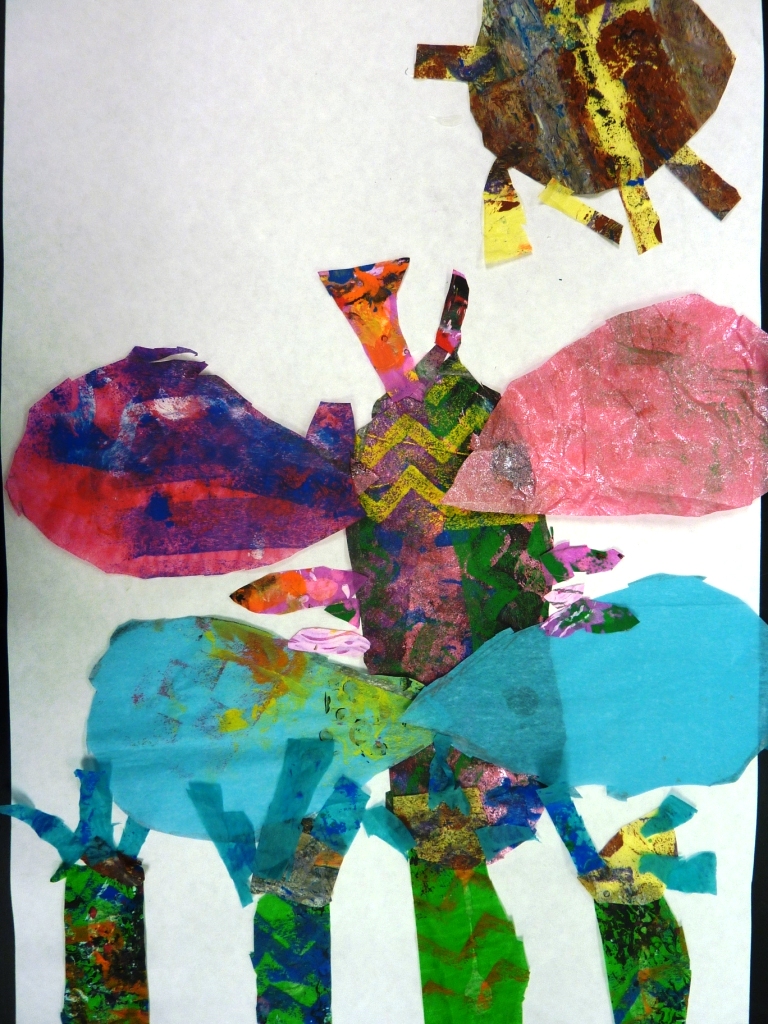
I showed them how to use these shapes to trace onto the tissue paper, cut them out and then glue them onto a piece of white paper to create an insect composition.
Even using the patterns, their pictures turned out so different!
I will definitely be keeping this lesson for next year!!
Pin It
Showing posts with label tissue paper. Show all posts
Thursday, March 15, 2012
Wednesday, June 8, 2011
PreKinder Ocean Collages
The ocean collages that my PreK students did took quite awhile to complete and a lot of patience for little students!
We started the process by covering a piece of drawing paper with pieces of tissue paper. We brushed them onto the paper using a paintbrush and water.
Important note!!!! Make sure when you buy your tissue paper that you get the tissue paper that bleeds. The first time I tried this, I bought the bleedless kind- that doesn't work at all for this type of project.
After covering the entire paper, we put them on the drying rack and let them dry.
When they came to see me the next time, I had them peel all of the tissue paper off, so that they could see the "magic" transformation of their paper. The excitement is well worth the hundreds of pieces of wadded up tissue paper that were flying all over the place.
We made a game out of picking up the trash and had it cleaned up in no time!
I had the students do 2 steps during this session (I am lucky enough to have the PK teacher and their assistant come with them, so I can have a couple of different activities going at one time).
I had the students finger paint 2-3 pieces of paper and then use a variety of combs, kush balls, sponges, etc to create textures on these papers. These papers were then put to the side to dry to be used later for our fish.
While the students were finger painting, I had a group come to me and we used sponges to paint our ocean floor (brown) and seaweed (fluorescent green).
For the last step of this project, once everything had been painted and was dry, I showed the students how to cut a fish (oval body, triangle tail) and had them cut 2-3 fish. Then they used glue dots to put them into their collage. Pin It
We started the process by covering a piece of drawing paper with pieces of tissue paper. We brushed them onto the paper using a paintbrush and water.
Important note!!!! Make sure when you buy your tissue paper that you get the tissue paper that bleeds. The first time I tried this, I bought the bleedless kind- that doesn't work at all for this type of project.
After covering the entire paper, we put them on the drying rack and let them dry.
When they came to see me the next time, I had them peel all of the tissue paper off, so that they could see the "magic" transformation of their paper. The excitement is well worth the hundreds of pieces of wadded up tissue paper that were flying all over the place.
We made a game out of picking up the trash and had it cleaned up in no time!
I had the students do 2 steps during this session (I am lucky enough to have the PK teacher and their assistant come with them, so I can have a couple of different activities going at one time).
I had the students finger paint 2-3 pieces of paper and then use a variety of combs, kush balls, sponges, etc to create textures on these papers. These papers were then put to the side to dry to be used later for our fish.
While the students were finger painting, I had a group come to me and we used sponges to paint our ocean floor (brown) and seaweed (fluorescent green).
For the last step of this project, once everything had been painted and was dry, I showed the students how to cut a fish (oval body, triangle tail) and had them cut 2-3 fish. Then they used glue dots to put them into their collage. Pin It
Labels:
collage,
fingerpaint,
PreKinder,
tempera,
tissue paper
Thursday, April 7, 2011
Fifth Grade Giacometti Sculptures
Materials Needed
• Plastercraft cut into small strips
• Water containers
• Aluminum foil (heavy)
• Masking tape
• Acryllic Paint
• Mod Podge
• Giacometti prints
We did this project as a continuation of the Schapiro project. The students had to create a sculpture of the figure that they had created out of paper.
We looked at different artwork by Alberto Giacometti and talked about how they were all similar. Then we created an armature for our figure out of aluminum foil. We used a piece of foil about 15-18" long and made 3 cuts.
They scrunched the foil to form the human figure. It was important that they do this slowly and carefully or their foil would rip. Once they had the general form for their figure, they could then scrunch it tighter to make it skinnier. They posed the figure into the action that they had used on their 2D project and then they were ready to cover it with Plastercraft strips. I had them cover the entire sculpture 1 time and then use Plastercraft to attach their figure to a cardboard base (corrugated cardboard works the best).
When the Plastercraft was dry, they used papier mache glue and glued tissue paper squares to their figure. I told them to use as many different colors as they could. This was easier for some than others. Many of them really wanted them to look real!
They covered the tissue paper with Mod Podge (you could probably skip the papier mache glue and go right to the Mod Podge to attach the tissue paper) and let this dry.
The final step was using metallic acryllic paint to add all of the fun details that they had added to their 2D project. Again, I told them to go CRAZY- they aren't used to me saying this, so they had fun with it.
Vocabulary:
Armature, balance, form, Plastercraft Pin It
• Water containers
• Aluminum foil (heavy)
• Masking tape
• Acryllic Paint
• Mod Podge
• Giacometti prints
We did this project as a continuation of the Schapiro project. The students had to create a sculpture of the figure that they had created out of paper.
We looked at different artwork by Alberto Giacometti and talked about how they were all similar. Then we created an armature for our figure out of aluminum foil. We used a piece of foil about 15-18" long and made 3 cuts.
When the Plastercraft was dry, they used papier mache glue and glued tissue paper squares to their figure. I told them to use as many different colors as they could. This was easier for some than others. Many of them really wanted them to look real!
They covered the tissue paper with Mod Podge (you could probably skip the papier mache glue and go right to the Mod Podge to attach the tissue paper) and let this dry.
The final step was using metallic acryllic paint to add all of the fun details that they had added to their 2D project. Again, I told them to go CRAZY- they aren't used to me saying this, so they had fun with it.
Vocabulary:
Armature, balance, form, Plastercraft Pin It
Labels:
armature,
fifth grade,
Giacometti,
human figure,
Mod Podge,
plastercraft,
sculpture,
tissue paper
Wednesday, August 4, 2010
Fourth Grade Egyptian Masks
Materials Needed
• plastic masks- purchased from Sax (Make-A-Mask Plastic Face Form http://store.schoolspecialtyonline.net/OA_HTML/ibeCCtpItmDspRte.jsp?item=516866&minisite=10206
• cardboard (Egyptian headdress/"beard")
• masking tape• plastercraft
• tissue paper- variety of colors
• acrylic paint
• jewels
• white paper (eyes)
black marker to outline eyes
Fourth grade looked at "Egyptian Mummy Case" and "Limestone Bust of Queen Nefertiti", both by unknown artists. They looked for the symmetry in the masks and the patterns that were used to decorate them. Then the students began making their own Egyptian Pharaoh’s mask. I had a variety of Egyptian resources on hand for them so that they could look for hieroglyphics, patterns, colors, etc.
I had a parent volunteer help me cut poster board headdresses that the students taped onto the masks. They had a hole in the middle that fit over the top of the facial form.
Labels:
Egypt,
fourth grade,
mask,
pharaoh,
plastercraft,
tissue paper
Thursday, July 1, 2010
PreKinder Matisse Animals
For the next class, I read the book Brown Bear, Brown Bear to the students.
We talked about the different animals in the book and the shapes that are used
to draw them. Each student chose 1 animal to make using die-cut construction
paper shapes. I reminded them how to apply glue using dots and they got to work.
When their animal was finished, they used crayons to decorate their animal. Pin It
Labels:
animals,
Brown Bear,
collage,
Matisse,
PreKinder,
shapes,
tissue paper
Subscribe to:
Posts (Atom)