Friday, September 9, 2011

Fifth Grade Sketchbooks

Every year, my 2nd through 5th graders make their own sketchbooks. We make these out of basic manila and construction paper, stapled together. The students use these to do quick drawings of what they want their final product to look like. At the end of the year, the students get to take them home and they have a sketchbook to draw in over the summer. Last year, I gave the students a challenge: keep your sketchbook and draw in it throughout the summer vacation. Bring it back in the fall and I will automatically give you extra credit. I actually had quite a few students who took this challenge to heart and brought their sketchbooks to me during the first 2 weeks of school.
This year, I decided to splurge on the 5th grade sketchbooks. I bought a journal making kit from Sax (Item #404154).


The students used metallic watercolor paint and painted 2 pieces of paper (I gave them a choice of white or black- next year, I might give them more options) and they filled the pages with color.


When the pages were filled with color, they ripped the papers into pieces the size of a quarter.


They applied the pieces to the chipboard covers using tempera varnish, creating a collage effect.


 When both boards were completely dry, they assembled their sketchbook with 2 chipboards, 30 pages and 1 spiral binder. I let them use metallic markers to decorate the covers. Throughout the year, they will be able to use these to plan out their projects, draw, create a scrapbook, etc. At the end of the year, they will have a genuine sketchbook to take home.

They are so excited about these- especially since they are the only grade level that got to make them! I debated about spending the money on it, but watching the excitement and pride makes it all worthwhile!
Pin It

Tuesday, August 23, 2011

Classroom

Since we are starting a brand new year, I thought I would post some pictures of my classroom set up. Some show my basic organizational strategies, some are wall displays, discipline, etc. I would love to see your rooms! If you have pictures, leave your blog address so that we can check out your space. I am always looking for new ways to organize my room.

Class sketchbooks
Outside of sketchbook cabinet

No room/need for a desk- I just use the top of a paper cabinet for my personal workspace.

Seascape, portrait, architecture, sculpture, still-life and landscape art prints

Art books and book jackets displayed above cabinets. We are not allowed to use this space for storage- it is against fire code. So I use it as display space. No wasted space!!

I have 8 really large tables. It is very hard to find a good placement for them all. I have tried placing them together to great larger tables. This year, I am going with this configuration. We will see how this works once we get going on projects...

My elementary students have a hard time grasping the concept that glaze changes (sometimes drastically!) once it is fired. Therefore, one year, I decided to create a visual for them. A dab of each color that I had (I try to keep up as I order new and fun colors) with the name next to it. Then as we work on a clay project, they can go see what the color will look like on their finished project.

Window display

Wall display

Bulletin boards

Table points, after you finish your work...


Outside of the artroom: art career awareness. I try to change this out once a month. Our school really focuses on career awareness, so this is my contribution.

I post my daily objectives outside my door. I got tired of having little fingers erase my board, so I bought a cheap shower curtain. I cut it to fit the board and strategically placed pieces of velcro around the outside. Now I can just lift the plastic when I need to change the objectives. So much easier and less frustration!!

Each table is labeled with an artist. This is how I call tables to get materials, line up, etc. I also xeroxed basic drawing tips (lines, patterns, shapes, facial proportions) and hung them on hooks at each table. Now there is a quick reference at their fingertips!


Pin It

Monday, August 8, 2011

Back to school Ideas

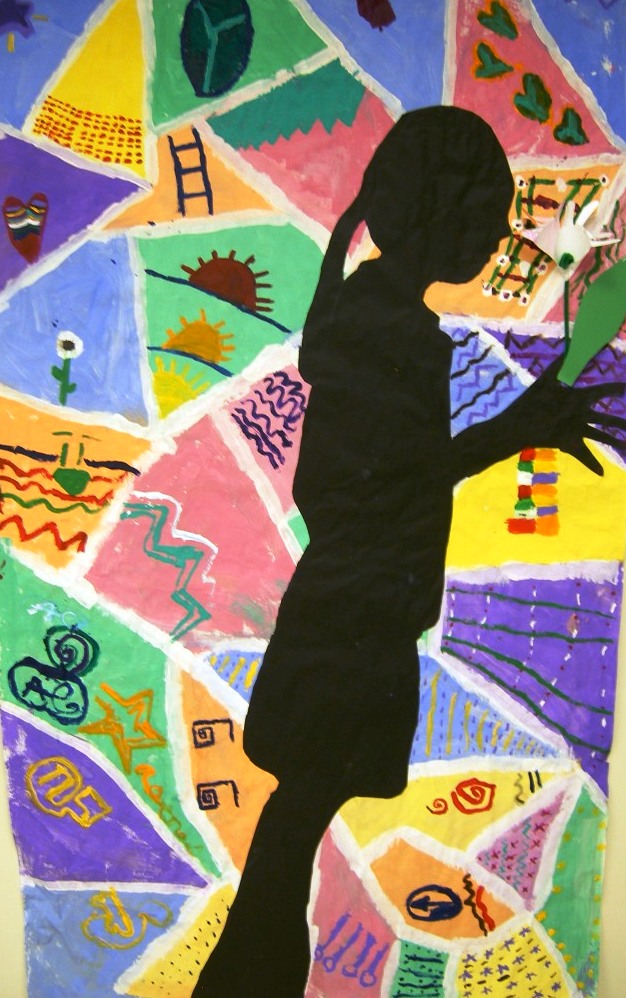
A fellow art teacher in my district (smART Class) recently asked for back to school ideas.  Thanks, Natalie, for the suggestion! I had forgotten all about this project!! Here is a project that I did a couple of years ago. Each grade level had their own contribution towards these life-size sihouettes.

PK-Kinder: were traced onto black butcher paper for the black silhouettes (I had 2 parent volunteers who did all of the tracing for me). They also traced their hands and made the flowers that the silhouettes are holding

1st and 2nd grade: painted the colored backgrounds onto white butcher paper and glued the silhouettes onto the colored backgrounds

3rd grade: painted the white outlines and cut out all of the silhouettes

4th and 5th grade: painted all of the intricate patterns onto the colored background and helped hang all of the pieces.


Pin It

Tuesday, August 2, 2011

Tall Tales- A House for Hermit Crab

  Our last summer session was based around the book A House for Hermit Crab by Eric Carle. "Time to move," said Hermit Crab one day. Hermit Crab has grown too big for his shell and must find a new home. He finds a newer, bigger shell, but it is very plain! He meets some sea anemones and asks them if they want to decorate the outside of his shell. He eventually covers his new home with a colorful sea star, some coral, a sea snail, a sea urchin, and a lantern fish. However, by the time he gets his home just the way he likes it, he has outgrown the shell again! I absolutely love using Eric Carle's books in my classroom and this one was no different.
The 2-5 year olds made their own hermit crab out of a paper plate and a tracing of their hand (see Kids Count 1234 for this lesson and more). The caregivers helped the little ones trace their hand onto a piece of construction paper and then cut it out. This became the hermit crabs body. They glued it onto a piece of white drawing paper and added details to their crab. Then they glued a paper plate onto the paper, for the crabs shell. To decorate, I pulled out all of the leftover craft materials from the previous weeks (sequins, scrap paper, pipe cleaners, silk flowers, etc) and they glued this all over
their shell. I also had real seashells that they could use in their collage.

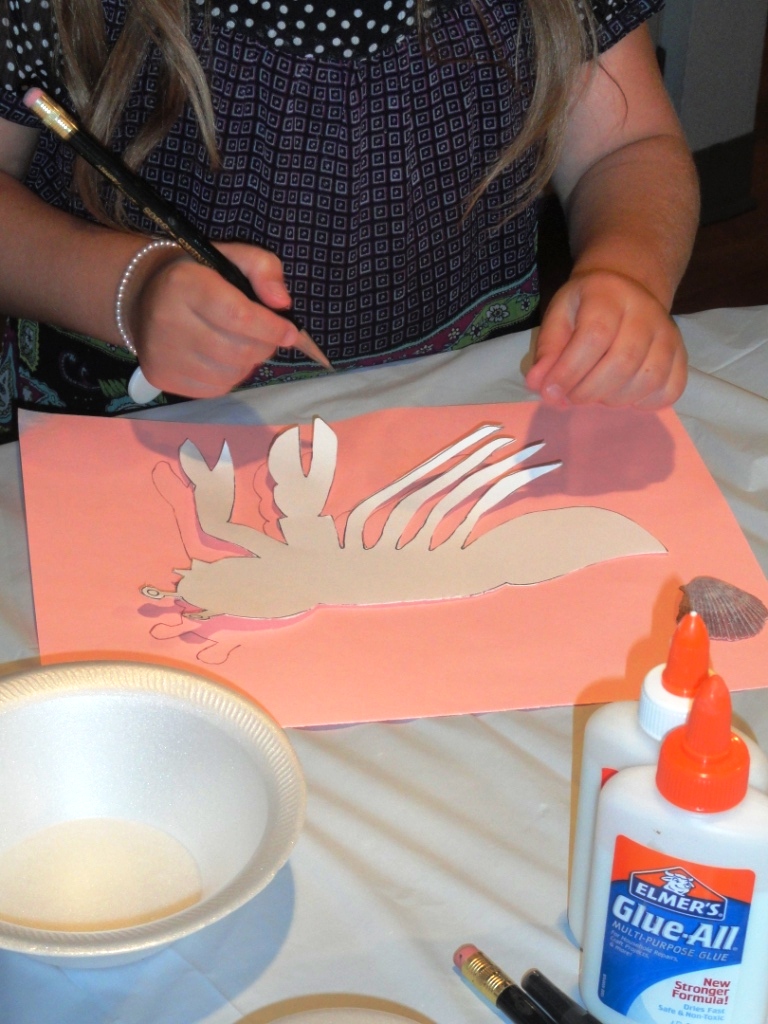
The 6-7 year olds also made a hermit crab, but they used a template to trace the body (see Lesson Plan Source for this project) and a Styrofoam bowl for the shell. The students traced the template onto a piece of colored construction paper and then cut it out. They glued the crabs body onto a
piece of white drawing paper and then glued a Styrofoam bowl onto it for the shell. The painted a layer of glue onto the bowl with a paintbrush and then sprinkled sand onto the bowl. They used the same leftover materials that the 2-5 year olds used to decorate their crab shells. I also gave them real shells to add embellishments.

The 8 and up group made their hermit crab out of Crayola Air Dry clay and real shells. They were shown how to use the clay to form the crabs body, claws, antennae and then place it inside of the shell that they had chosen. Some

 children went all out and made sea turtles, snails, etc using the clay and shells. When they had finished making their sea creature, there were blow dryers available to help dry the clay. Each table was given a variety of different tempera paints and they decorated their creature and the paper plate that they were sitting on. We had some wonderful ocean scenes! We also made some of our leftover craft materials available for those who really wanted to get into it.
Pin It

Monday, August 1, 2011

Tall Tales- Iggy Peck, Architect

Our next book in the summer art program was Iggy Peck, Architect by Andrea Beaty and David Roberts. Iggy Peck is a very creative and independent little boy who has a passion for building things with whatever materials he can find: food, dirty diapers (that got a lot of giggles from the children!), dirt, etc. However, when he gets to the second grade, his teacher tells him that he cannot build anymore! The class goes on a field trip and Iggy's building skills save the day!

The projects that we worked on this week, all had to do with architecture.

The 2-5 year olds made paper bag houses. They started out with lunch sized paper bags and filled them with newspaper. The top was folded over and stapled. They covered the top with a folded piece of paper to make it look like a roof. The bag was then glued onto a recycled piece of cardboard, to create a base. From here, the children had a wonderful time cutting, gluing, adding texture (I brought in some texture plates and let them add texture to construction paper) and going crazy creating their houses. We had beach houses, mansions, crooked houses, etc.


The 6 and 7 year olds traveled to Egypt and made sugar cube pyramids. They heard the word sugar cube and got very excited! They started out by gluing a 6 x 6 grid of cubes onto a paper plate. Then added a 5 x 5 grid on top of that, then 4 x 4, continuing to decrease until they got to a single cube at the very top. I found that tacky glue worked better on this than regular school glue. It was a lot sturdier and held the cubes in place better.

When they were finished gluing the cubes, one of our high school volunteers took the children outside and we use spray stain (I will never go back to brush on stain again!!!) and they sprayed them light brown, making them look like they were built in the desert. Then they got to add fun details: palm trees, camels, people, etc. using any left over craft materials that we had from the previous weeks.

The 8 year olds did a lesson that I found on the  Deep Space Sparkle blog. I bought her "Architecture Made Easy" lesson guide for $5. It's a downloadable PDF file, so you just save it right to your computer and then open it any time you need a lesson. Affordable and easy! Architecture Made Easy- Deep Space Sparkle.The lesson that the children did was the castles. I started out by having a few rectangle templates ready for them to trace onto their drawing paper (usually, I don't go in for templates for my older students, but since this was a 1 time, hour class, I went ahead and did it to allow the children more time to finish the castles). Once they had the rectangles traced for the front of the castle, the turrets, etc, then they began adding details: bricks, windows, drawbridge, flags and banners, etc. They traced the entire drawing with a permanent black marker and then used crayons and colored pencils to color them in.


Pin It